Newbie here with Vermont Castings Reliance 2220

  • Active since 1995, Hearth.com is THE place on the internet for free information and advice about wood stoves, pellet stoves and other energy saving equipment.

    We strive to provide opinions, articles, discussions and history related to Hearth Products and in a more general sense, energy issues.

    We promote the EFFICIENT, RESPONSIBLE, CLEAN and SAFE use of all fuels, whether renewable or fossil.
  • Hope everyone has a wonderful and warm Thanksgiving!
  • Super Cedar firestarters 30% discount Use code Hearth2024 Click here
So after living with the stove for a few weeks I had come to the conclusion that the exhaust blower was the source of most of the noise.
I took it out and ran it on the bench and noticed that besides the slightly unbalanced impeller, that the motor bearings were shot. It would hit a resonance point and really start a racket.

Looking around I saw that a replacement blower was north of $200, almost as much as I paid for the stove.
I also didn't like all the hardware that needed to be removed in order to clean the blower and the plenum beneath it.
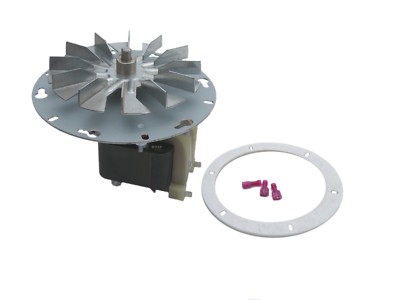
Looking around I found a general replacement blower sold by Pellethead on Ebay that seemed to fit the bill, best of all it was only $99.

It had the same 4.75" impeller, a 3000 rpm motor, and it drew about the same current. It was also ball bearing and made by Fasco so that was the deal clincher.
I ordered the unit and installed it last Friday, much quieter.
I had to drill out the set screw on the old impeller, it was long since rusted tight.
After removing the old motor I used the supplied gasket to cut a 5" hole on the top of the blower housing to mount the new assembly. I made sure to paint the bottom of the mounting plate and impeller with high temperature stove paint and coat the motor shaft and set screw with never seize so future repairs would be easier.

Now when I want to remove the blower, it is only 6 small screws and the whole unit will lift off making cleaning much easier.
Its a lot quieter too when it runs.
Hey Bill, I know it's been awhile since you replaced that combustion motor, I like the idea of ball bearings that are sealed, and your easy removal mod too. By chance, is this (below link) the one you used?

https://www.ebay.com/itm/ENGLANDER-...e=STRK:MEBIDX:IT&_trksid=p2060353.m1438.l2649

Mine still has OEM big grey one with two hidden oil ports and occasionally I'll get a loud squeal on start up that fades away. I got some oil in it today ... I think ... but have decided I want to replace the old thing. I have a new auger motor, but as you know, they are easy to R&R as they almost "float" but this combustion motor is a bear that doesn't have to be.

Thank You Sir.
 
Hey Bill, I know it's been awhile since you replaced that combustion motor, I like the idea of ball bearings that are sealed, and your easy removal mod too. By chance, is this (below link) the one you used?

https://www.ebay.com/itm/ENGLANDER-PELLET-COMBUSTION-EXHAUST-XP7610-BLOWER-MOTOR-4-3-4-Fan-PU-076002B/163362739023?ssPageName=STRK:MEBIDX:IT&_trksid=p2060353.m1438.l2649

Mine still has OEM big grey one with two hidden oil ports and occasionally I'll get a loud squeal on start up that fades away. I got some oil in it today ... I think ... but have decided I want to replace the old thing. I have a new auger motor, but as you know, they are easy to R&R as they almost "float" but this combustion motor is a bear that doesn't have to be.

Thank You Sir.
Hi Bear, this is a link to the blower that I bought, very similar to the one you listed:

Great job on the burn pot replacement.
 
  • Like
Reactions: tbear853
Thank you, is same .... will get one here soon and have on hand for spring '21 .... or to have if needed before then, just the next time I need to pull it. After getting some oil in, the squeak is gone for now ... but like you, I like the idea of sealed ball bearings versus oilite sleeve bearings that are there now... but then it has lasted all these years?
 
So tonight 11-30-2020 was first start up with new burn pot and stove clean, new flu, oiled convection motor too. I think I likely put too many pellets in the burn pot to start before adding gel, maybe I was just anxious? Anyway, I put a handful in, maybe too big a handful, because once started to burning, the stove was cold, the feed rate overfilled the burn pot and un touched pellets were falling into the ash bin and pushed even fire starter gel coated pieces in, some very few were blackened.

So I waited for some heat, hit off button, auger stopped but combustion fan kept going as it sensed heat, I shoveled some unburned pellets into the ash pan, let the combustion fan run, no auger, then I got a metal bucket and emptied the ash pan's unburned pellets into it, then put my hand in them, they were room temp at best, so I dumped them in hopper to recycle.

After a few minutes watching, seen thin layer of pellets aflame across burn pot, flames were good, hit green go button. Stove working GREAT.

I'm thinking of making a 6 or 8 inch long extension from a left over 24" piece of 3" Dura Vent, to bring my stove out into the room that far for easier service access. Tucked back into this corner, the 400 pound stove is not so easy to move at will. I have the flue pipe that is the insulated venting, it's just two seasons old, the inner wall or tube is stainless steel, I just need the female end good so it will twist lock into my current fitting which I initially just relieved to let me clam the inner but it still has locking tabs, but the stove end I'll trim to length, inner & outer, add a couple or 4 slits in narrow "vees" so clamps will tighten outer to inner to tighten inner to the steel pipe like stove exhaust stub. I could just cut the outer an inch or so shorter to allow easy clamping of the inner? Likely if I do this, I'll just replace the adjustable elbow at the same time.

It'll work out .
 

Attachments

  • [Hearth.com] Newbie here with Vermont Castings Reliance 2220
    too many at start (640x528).webp
    57.2 KB · Views: 214
  • [Hearth.com] Newbie here with Vermont Castings Reliance 2220
    good (1) (640x466).webp
    72.7 KB · Views: 203
  • [Hearth.com] Newbie here with Vermont Castings Reliance 2220
    good (4) (640x467).webp
    45 KB · Views: 193
  • [Hearth.com] Newbie here with Vermont Castings Reliance 2220
    11-30-20 stove back (640x446)EXT.webp
    68.1 KB · Views: 210
  • Like
Reactions: Mt Bob
So tonight 11-30-2020 was first start up with new burn pot and stove clean, new flu, oiled convection motor too. I think I likely put too many pellets in the burn pot to start before adding gel, maybe I was just anxious? Anyway, I put a handful in, maybe too big a handful, because once started to burning, the stove was cold, the feed rate overfilled the burn pot and un touched pellets were falling into the ash bin and pushed even fire starter gel coated pieces in, some very few were blackened.

So I waited for some heat, hit off button, auger stopped but combustion fan kept going as it sensed heat, I shoveled some unburned pellets into the ash pan, let the combustion fan run, no auger, then I got a metal bucket and emptied the ash pan's unburned pellets into it, then put my hand in them, they were room temp at best, so I dumped them in hopper to recycle.

After a few minutes watching, seen thin layer of pellets aflame across burn pot, flames were good, hit green go button. Stove working GREAT.

I'm thinking of making a 6 or 8 inch long extension from a left over 24" piece of 3" Dura Vent, to bring my stove out into the room that far for easier service access. Tucked back into this corner, the 400 pound stove is not so easy to move at will. I have the flue pipe that is the insulated venting, it's just two seasons old, the inner wall or tube is stainless steel, I just need the female end good so it will twist lock into my current fitting which I initially just relieved to let me clam the inner but it still has locking tabs, but the stove end I'll trim to length, inner & outer, add a couple or 4 slits in narrow "vees" so clamps will tighten outer to inner to tighten inner to the steel pipe like stove exhaust stub. I could just cut the outer an inch or so shorter to allow easy clamping of the inner? Likely if I do this, I'll just replace the adjustable elbow at the same time.

It'll work out .
Welcome to realizing that bit of lost space in front of stove,(which is never used,anyway) is better used to not have the stove slammed against the wall,making it unserviceable,unless unhooked and slid out.I have tried to explain this to people for years.Some things,i do not think duravent makes a 6" section,that you want,would be nice if they did.Perhaps call them?Cutting/modifying a section,it might be hard to get it to seal,and,not be legal or insurance approved.However,consider what i did on one of my stoves,my Harman.I have always hated the stupid Harman tapered flue connector,they suck to work on.So,I took mine,cleaned it,got a section of exhaust pipe from local muffler shop,welded it on,4"(because I am at high altitude,larger dia. required), then i used the "appliance adapter" that has an o-ring, and is held in place with a hose clamp.Now,it does not stick out much,from the stove rear shields,so there is only a little section uncovered,OK for insurance and legal.BUT,if it was a bit longer,a small wrap of rock wool would make it legal.Just some food for thought,to make your project easier.
 
  • Like
Reactions: tbear853
... etc ... i do not think duravent makes a 6" section,that you want, ... etc ...
I know they make 12" sections, and I'm still on the fence. I used to just grab a crowbar and block of thin wood and walk it out in a few minutes, inch at a time, but I've had some issue slow me down in the last couple three years. I looked at an adapter for the stove end, it's made like just a few inch long pipe with and inch or so inner SS liner extended out so it could be clamped to the stove is what put it in my mind.

Thank You for your comments too!
 
Well it was as I figured, I tried to start with too many pellets in. I turned it up to the 9 o;clock position on the heat control knob, let it run unmolested for 6 hours and change, then took some pics of the flame. I even opened the door once to get the door log out of the way temporarily, and this burn pot is gonna be just fine I think. The auger motor is quiet and the combustion fan that I oiled as best as I could, maybe a 1/2 second long squeak at first start, quiet ever since. Now I wish I had that middle log unbroken in place. I have it in a box but never figured a way to repair it.

Last year, when it still had the OEM burn pot with air leaking cracks including across the front seam, it would have started to black the glass by now, but it's spotless still. I think the new burn pot was a good hit!
 

Attachments

  • [Hearth.com] Newbie here with Vermont Castings Reliance 2220
    6 hrs in 9 oclock pos 640w (4).webp
    53.6 KB · Views: 206
  • [Hearth.com] Newbie here with Vermont Castings Reliance 2220
    6 hrs in 9 oclock pos 640w (6).webp
    64 KB · Views: 196
  • [Hearth.com] Newbie here with Vermont Castings Reliance 2220
    6 hrs in 9 oclock pos 640w (1).webp
    50.9 KB · Views: 213
OK, it's Wednesday, I fired the stove up Monday, and there is maybe a tea spoon of ash dust in the ash pan, the stove has been pretty quiet, and the flame looks great. I see that that shelf I added to the Harmon burn pot is not just redirecting flame outwards away from the fire box back wall, but seems to limit burn by limiting air at the auger end, and ... my glass is still clean. I've done some "mapping" and have decided that a 6" flu extension will near double my access room to the back for maintenance too, just a longish stove adapter.

I also took apart some flue pipe yesterday, the near new 24" piece (was coupled to a 36" piece for a 5 foot run, replaced with a single 5 foot piece I had bought a couple years ago) ... it has a smooth stainless steel inner pipe, a galvume like steel outer, just 1 rivet at one end that secured it in place and it was loose so it was by accident the inner slipped out of the outer. I still have the holes and the spent solid rivet, I could use a SS pop rivet and peen the rivet on a near 3" old brake caliper piston as an anvil locking the rivet's mandrel end in place.

There was NO inner insulation, just air space. The one end does have a O-ring where the older versions had just a wrap or two of a rope like seal. No crimp length wise like all the older pipes, this new pipe's both inner & outer pieces are seamless being welded electrically from end to end. You can see the weld, but it's so smooth, there's no feeling it. It'll make a great well fitting slightly longer stove adapter. The air space between inner & outer is about 9/32s inch, that's just a hair under 5/16". One could form a spiral of 5/16 OD copper tube, just for use as an interior spacer. Make the inner tube a inch longer than outer case so it could be clamped to the stove outlet securely and it would be at least as good as factory made.

I was reading other posts, saw mention of replacing the gasket between the burn pot and fire box back wall to limit build up at the auger outlet of an Accentra FS. There are only two passages there, one is the auger in a tube that extends into the burn pot so the gasket never sees flame or creosote there, the other seals a passageway for cold air being drawn into the burn pot. Just pointing it out.
 

Attachments

  • [Hearth.com] Newbie here with Vermont Castings Reliance 2220
    120120 flue pie 24 inch (1) 640w detail - Copy.webp
    89.5 KB · Views: 204
Nice work Tbear, its good to know if i ever needed to replace my burn pot that the Acentra part would work.
Would you say that it burns as good as the original when it wasn't cracked?
They really are good stoves and even though original parts are hard to come by, can be kept going with a little ingenuity.
So far, absolutely as good. Flames have a blue base, but that front log blocks a good view of them. I could remove the front faux log for a picture now that I think on it. Don't know how hot it gets. I think the added shelf maybe helped get the flame out from the back, maybe .... but then I never tried it without. Remember, I also plugged igniter mount holes and added 4 air hole to fill out the short back row. I counted the OEM holes today, 80 was right, but they are smaller. I cleaned some more on the OEM too, chipped away buildup, found cracks are longer than I realized. Also, the front weld had let go a third of it's length. I might be able to just replace the front 2" of the piece with the holes, gonna be tough getting much further back without major surgery. I hate to cut all apart to replace the "floor" piece, but I need to keep a smooth floor for scraping & pellet movement. I may just piddle with it down the road.
 
If you have any Sales Brochure please post it, that would be cool. :)
I took some pics of stuff related to the Reliance, and I found the OEM thermocouple stored with it.
 

Attachments

  • [Hearth.com] Newbie here with Vermont Castings Reliance 2220
    PAPERS (1).webp
    132.6 KB · Views: 194
  • [Hearth.com] Newbie here with Vermont Castings Reliance 2220
    PAPERS (2).webp
    93.3 KB · Views: 188
  • [Hearth.com] Newbie here with Vermont Castings Reliance 2220
    PAPERS (3).webp
    218.6 KB · Views: 178
  • [Hearth.com] Newbie here with Vermont Castings Reliance 2220
    PAPERS (4).webp
    184.3 KB · Views: 174
  • [Hearth.com] Newbie here with Vermont Castings Reliance 2220
    PAPERS (5).webp
    88 KB · Views: 185
  • [Hearth.com] Newbie here with Vermont Castings Reliance 2220
    PAPERS (6).webp
    83.4 KB · Views: 184
  • [Hearth.com] Newbie here with Vermont Castings Reliance 2220
    PAPERS (7).webp
    108.4 KB · Views: 180
  • [Hearth.com] Newbie here with Vermont Castings Reliance 2220
    PAPERS (8).webp
    155.9 KB · Views: 180
  • [Hearth.com] Newbie here with Vermont Castings Reliance 2220
    PAPERS.webp
    75.3 KB · Views: 177
  • [Hearth.com] Newbie here with Vermont Castings Reliance 2220
    THERMOCOUPLE.webp
    72.1 KB · Views: 183
  • Like
Reactions: Ssyko
Anyone with one of these old Vermont Castings Reliance stoves, if you are debating about the aged Burn Pot, cracks, leaking combustion air out of cracks instead of up through the air holes, take a look back at post #13, #22, #23 in particular. This stove is 28 years young, soon to be 29.

I had restarted it for the first time this year back on Dec 1st I believe. Like it always has, after 24 or 30 or so hours, the glass started sooting up. I shut it down yesterday Dec 10th. The picture was a few days into the burn.

Today after it was "cold", I did a cleanup, the burn pot cleaned up really fast, I love the bigger access to the chamber under it too. I vacuumed excess dust, all fines and ash too. I vacummed the inside of the glass to get the majority of soot off of it, then I cleaned it with Windex.

I put just one handfull of pellets into the burn pot, a bit of gell starter, lit it, let it burn maybe5 minutes, added a few more, then when going good, pressed the green start button. Unlike last time (when I about choked it with too many pellets), this time I was rewarded with a beautiful fire in minutes with no wastes. I also will comment that since I fired it on /about the 1st, it has performed flawlessly. Very little ash too. Looking good!
 

Attachments

  • [Hearth.com] Newbie here with Vermont Castings Reliance 2220
    2020-12-11 (1) days ago (640x480).webp
    23.8 KB · Views: 187
  • [Hearth.com] Newbie here with Vermont Castings Reliance 2220
    2020-12-11 (5) (640x480).webp
    65.6 KB · Views: 196
  • [Hearth.com] Newbie here with Vermont Castings Reliance 2220
    2020-12-11 (7) (640x478).webp
    52.9 KB · Views: 174
  • [Hearth.com] Newbie here with Vermont Castings Reliance 2220
    2020-12-11 (12) (640x608).webp
    72.3 KB · Views: 175
  • [Hearth.com] Newbie here with Vermont Castings Reliance 2220
    2020-12-11 (15) (640x480).webp
    45.5 KB · Views: 182
  • [Hearth.com] Newbie here with Vermont Castings Reliance 2220
    2020-12-11 (17) (640x594).webp
    65.9 KB · Views: 192
  • Like
Reactions: Mt Bob and Ssyko
Nice refurbish Tbear. Runs like it looks!!!:cool:
 
  • Like
Reactions: Mt Bob and tbear853
Welcome to realizing that bit of lost space in front of stove ... etc ... Just some food for thought,to make your project easier.
Hi Bob, well I thought on it, read you suggestions closely, measured my stove & hearth pretty close, decided that a 6" extension would do what I want ... to move the stove out 6" from the corner and that get's the rear cover 6" out of the close space, and while 6" doesn't sound like a lot, it'll work well for me and still leave me ample hearth to step up onto to load, etc. It'll make cleaning easier, service easier, I'll b e able to access the 6 screws and rear cover easier too. I won't fool with swapping it out until my next cleaning. The stove has been running like I just put it in in 1992. I meant to cut the outer covering pipe at 7" and the inner at 8" to give me a 1" wide clamping area to attach/seal the SS inner to the 3" OD steel pipe like stove outlet (it's near 3" long so there will be plenty of overlap) . In the process, I cut the outer covering pipe to just 6-1/2" instead, so now I have 1-1/2" of free clamping end. I still have the same inner length, but I can likely access the clamping area easier. I used a left over piece of inner SS pipe with a raised area that I split and slipped down over the real inner to space the open end. I added some old rope stove seal in a loop and stuffed orange RTV in too.

I also had a new 90 degree elbow but I wanted a new 45, so I straightened by twisting one leg on the stove end, it stayed together, no damage but to guard against leaks, I sealed all seams and strapped an extra piece of left over outer over the straightened / sealed inner, I'll likely leave the clamps in place upon install behind my stove. The extra outer is something I did to protect the RTV. No rivets seen in a picture puncture the inner SS pipe except the one at the very end where the factory put a rivet in to secure inner to outer, they are steel and sealed via hammer & anvil nose too. The piece of 1 season used 3" Duravent was the newer one that has welded seams in both inner & outer pipes, no lengthwise crimps. I had the 24" long unused pipe, it was a simple matter to wipe clean.

Just wanted to say Thanks, you gave me some ideas or food for thought. This is gonna be fine.
 

Attachments

  • [Hearth.com] Newbie here with Vermont Castings Reliance 2220
    120120 flue pie 24 inch (1) cuts 640w detailed.webp
    114.3 KB · Views: 197
Very nice pics!
Thanks
 
  • Like
Reactions: tbear853
I have the 2220 need help with fixing control board. Everything works but auger is not Getting signal from control board to run . I have the same problem Bill A had. But he fixed his. Need help
 
I have the 2220 need help with fixing control board. Everything works but auger is not Getting signal from control board to run . I have the same problem Bill A had. But he fixed his. Need help
Hello Mike, as you already know there are really no spare parts available for this old stove. I repaired my own control board but I do / did that work for a living. You would need to be able to work on PC boards to be able to do this work.
The mechanicals of this stove are old Harmon PelPro, the control board is a version of the one that was in Harmon's first pellet stove.
Many of the newer Harmon spare parts will work such as the Accentra burn pot, and exhaust blower.


Here are the parts that I ordered from Mouser electronics, the triac and the optocoupler that controls it were shot on mine.

One other thing to note is that the exhaust temperature thermocouple is a type J, red and white wires, and is ungrounded, if you ground the TC wires it will short out something on the board. I also had to repair a blown circuit trace on mine, it may have been the cause of the bad triac.
Good luck, let me know how you make out.
PS, did you jump 120V directly to the feeder motor to make sure that it isn't the problem?

Bill

Mouser #:863-2N6071AG
Mfr. #:2N6071AG
Desc.:Triacs Triacs THY 4A 200V TRIAC
3$0.67$2.01
3 Shipped​
17-Oct-18​
Mouser #:512-MOC3011M
Mfr. #:MOC3011M
Desc.:Triac & SCR Output Optocouplers Triac & SCR Output Optocouplers DIP-6 NON-ZERO TRIAC
Bill what thermocoupler did you replace your with. Just for future info
 
Bill can you send me a photo of it or a part number. Ebay does not have by the link you sent me. Truly thank you so much for all your help
Your the best
Modifymike007
 
Bill can you send me a photo of it or a part number. Ebay does not have by the link you sent me. Truly thank you so much for all your help
Your the best
Modifymike007
The link worked for me, but here are the details.

TEMPCO MTA01331 Thermocouple Probe Type J Length 12 In​

Be the first to write a review
About this product
  • [Hearth.com] Newbie here with Vermont Castings Reliance 2220
  • [Hearth.com] Newbie here with Vermont Castings Reliance 2220
  • [Hearth.com] Newbie here with Vermont Castings Reliance 2220

Brand new: Lowest price

$38.20
+ $5.99 Shipping
  • Get it by Monday, Apr 18 from Minooka, Illinois
  • • New condition
  • • 30 day returns - Free returns
(TEMPCO MTA01331. Thermocouple Probe, Ungrounded, Thermocouple Type Type J, Probe Length 12 in, Plug or Connector Type Bare Wire, Material 316 Stainless Steel, Max. C) +/-2.2 Below 293 Degrees, Error Accuracy ( Percent) (Over 293 Degrees C) +/-0.75, Temp.
(broken link removed to https://www.ebay.com/itm/TEMPCO-MTA01331-Thermocouple-Probe-Type-J-Length-12-In-/313931297092?_trksid=p2349526.m4383.l4275.c1#viTabs_0)
See all 2 brand new listings
 
Hellooooooo bill got the thermo coupler you said. Question how did you use the hole thing . Or did you cut it down. Waiting for your reply. Got my control board fixed. Now ready to test the stove out. Just waiting to see how you made that thermocoupler work.
 
Hellooooooo bill got the thermo coupler you said. Question how did you use the hole thing . Or did you cut it down. Waiting for your reply. Got my control board fixed. Now ready to test the stove out. Just waiting to see how you made that thermocoupler work.
Hellooooo Mike, the thermocouple should have red and a white wires, type J. On the control board there is a two pin connector on the control board marked J2 which hopefully has the remnant wires from the last TC that was installed on a molex connector plug. You can just twist the red with the red and the white with the white and use small wire nuts, there is no need to cut the cable, I just coiled mine up and secured with a wire tie.
The probe end inserts into the exhaust flange, there should be a silver removable plate with a brass compression type fitting to hold it tight. If you don't have the fitting some hi temp silicone will do for sealing it up, temps here are usually below 500 deg F.

[Hearth.com] Newbie here with Vermont Castings Reliance 2220
 
Ok got you just one more question i put everything back togather and started up the stove. Correct me if i am wrong. I lit the pelletts shut door hit start and auger came on. I thought auger only came on when temp was reached???????
It runs all the time untill i hit the stop. I was thinking to unplug the thermocoupler to see if the auger stops running when start up cold and it does. Plug it back in auger runs. Somewere along the line something wrong i feel. Back to the dwraling board. Such a nice clean stove and omg beatulful stove.