
Dont beleive her. I do prefer to use all the same brand but i have put ventis pipe (which is what champion is) with many different manufacturers chimneys.Spoke to a rep from Northline Express this evening. Said Selkirk chimney is only compatible with Selkirk Stove pipe. Not sure I believe her.
Starting the hearth
- Thread starter KJamesJR
- Start date
-
Active since 1995, Hearth.com is THE place on the internet for free information and advice about wood stoves, pellet stoves and other energy saving equipment.
We strive to provide opinions, articles, discussions and history related to Hearth Products and in a more general sense, energy issues.
We promote the EFFICIENT, RESPONSIBLE, CLEAN and SAFE use of all fuels, whether renewable or fossil.
You are using an out of date browser. It may not display this or other websites correctly.
You should upgrade or use an alternative browser.
You should upgrade or use an alternative browser.
https://www.northlineexpress.com/6-dsp-chimney-pipe-adapter-6dsp-cpa-5324.htmlDont beleive her. I do prefer to use all the same brand but i have put ventis pipe (which is what champion is) with many different manufacturers chimneys.
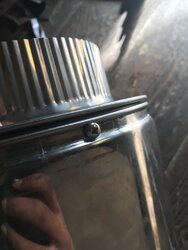
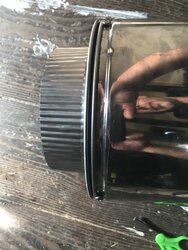
This is the adapter that comes with the Selkirk chimney kit. Think it should work with DuraTech double wall pipe?
It’s not that I have something against Selkirk stove pipe, but they’re not twist lock. Their double wall looks like a push in fit or something of the sort. I feel like it would get gumed up or leak.
DVL is not twist lock either except at the snap connector. Personally I'd stay with one brand for ease of installation, especially if there isn't a bunch of spare parts and adapters in the truck.
I absolutly agree i prefer using the same company. But i have never had any issues making dissimilar brands work together.DVL is not twist lock either except at the snap connector. Personally I'd stay with one brand for ease of installation, especially if there isn't a bunch of spare parts and adapters in the truck.
Okay. I will go with the Selkirk double wall pipe.
Should I include a damper?
EDIT:
Or the self tapping black pipe screws?
Should I include a damper?
EDIT:
Or the self tapping black pipe screws?
Selkirk has a crimped connection on both ends of their double-wall and connects to the ceiling support differently than DVL, which uses a stainless snap ring for the join. For that reason I am having a hard time visualizing how DVL would join to the Selkirk ceiling support box.I absolutly agree i prefer using the same company. But i have never had any issues making dissimilar brands work together.
Don't add a damper unless the total flue height is excessive. Yes, stove pipe should be screwed at each joint with 3 screws 120º apart.Okay. I will go with the Selkirk double wall pipe.
Should I include a damper?
EDIT:
Or the self tapping black pipe screws?
I have hooked ventis doublewall to selkirk chimneys quite a few times with no issues. Yes the chimney needs to have their adapter on the bottom but all i have worked on did. I really dont like their connection there though. It just isnt very secure. I have had them come loose a few times while cleaning.Selkirk has a crimped connection on both ends of their double-wall and connects to the ceiling support differently than DVL, which uses a stainless snap ring for the join. For that reason I am having a hard time visualizing how DVL would join to the Selkirk ceiling support box.
Okay. I'm finishing up my purchase. Expected delivery date is Oct 12th for all 13 items. Hopefully the chimney and pipe are the easiest part of this project.
Received half my order in today. Some items were on back order and I won’t receive them until Wednesday.
Opened up the boxes and my chimney pipe was bent and warped. Is this typical? Do you guys just bend it back to shape? I already contacted the supplier. I think I’m going to have them send me two new sections.
Opened up the boxes and my chimney pipe was bent and warped. Is this typical? Do you guys just bend it back to shape? I already contacted the supplier. I think I’m going to have them send me two new sections.
Attachments
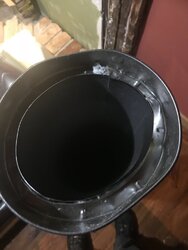
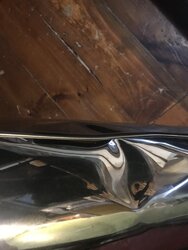
Nope not typical that pipe is trash.Received half my order in today. Some items were on back order and I won’t receive them until Wednesday.
Opened up the boxes and my chimney pipe was bent and warped. Is this typical? Do you guys just bend it back to shape? I already contacted the supplier. I think I’m going to have them send me two new sections.
I figured as much. Hopefully I’m not waiting too long for a replacement.Nope not typical that pipe is trash.
Thought I would just keep my install going on this thread.
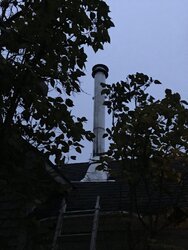
Making progress on the chimney install finally. Should be done before tonight.
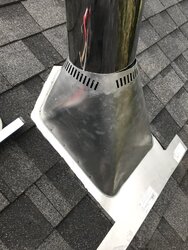
I took the advice from others and went with double wall insulated. I tried my best to put the flashing under enough courses of shingle. There were some shingle casualties. A piece of one broke off the last course. I nailed and siliconed in back in. I actually didn’t use too many nails. Just three alone the sides. Couldn’t lift the shingle up high enough to get the top. I ran a small bead of silicone under the flashing, and above the flashing, below the shingle. There’s enough overall metal under the shingle so I don’t think it will leak.
So far the hardest part about the chimney is framing in the support box, lifting/prying the shingle up and hoisting pipe on top a steep pitched roof.
Last things are the support bracket, storm collar and tighten/straighten the cap down. Then add the trim piece inside and connect the pipe.
Making progress on the chimney install finally. Should be done before tonight.
I took the advice from others and went with double wall insulated. I tried my best to put the flashing under enough courses of shingle. There were some shingle casualties. A piece of one broke off the last course. I nailed and siliconed in back in. I actually didn’t use too many nails. Just three alone the sides. Couldn’t lift the shingle up high enough to get the top. I ran a small bead of silicone under the flashing, and above the flashing, below the shingle. There’s enough overall metal under the shingle so I don’t think it will leak.
So far the hardest part about the chimney is framing in the support box, lifting/prying the shingle up and hoisting pipe on top a steep pitched roof.
Last things are the support bracket, storm collar and tighten/straighten the cap down. Then add the trim piece inside and connect the pipe.
Attachments

MAD MARK
Feeling the Heat
Well the rain came in and I haven’t noticed anything leaking in from the house.
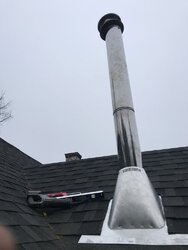
The way I left the chimney tonight. It’s about 1/2” out of plum but once the roof bracket is on I can fix that.
I’m also having issues getting the rain cap seated right. There’s nothing but a tapered inlet for the chimney to slide into. The instructions just say to press down evenly and attach the cinch band. Apparently I’m having issues getting the cap to sit evenly.
I also wanted to add:
I have a 12” pipe section beneath the flashing. I couldn’t get a locking band around that pipe and the stove pipe adapter because it wouldn’t slide into the finish “bucket”. I also couldn’t get a locking band around the 12” pipe and 48” pipe because it wouldn’t slide through the flashing. I’m hoping that’s not an issue.
Attachments
Last edited:
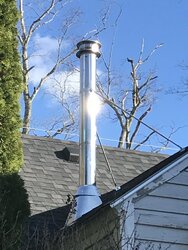
Today was a gorgeous day so I took the day off to finish the chimney.
I had some issues sleeping soundly last night due to not being able to get the locking bands around the joints below the flashing. I revisited the instructions and took note that three #8 - 1/2” stainless sheet metal screws can be used where locking bands can not. So that’s what I did.
Pulled all the sections back out, used three sheet metal screws around the first section of chimney pipe and stove pipe adapter. Tin snips where used to cut a small seam in the roof flashing, just under the storm collar. I then peeled that seam open. A locking band was used on the first section of chimney pipe-to stove adapter, then around the first section of pipe above the roof(still below flashing). I was able to creep the locking band past the seam I cut and installed it without issue. All seems are now secured properly.
Roof bracket was installed and pipe was plumbed and leveled before securing completely.
Called the town building inspector to come inspect and sign it off. Just need to polish my hand prints off it and call it a day.
Attachments
Got the stove pipe hooked up to the support box. Threw in a piece of balled up paper and lit it to check for smoke inside the house. Couldn’t see or smell anything.
Picked up another carbon monoxide detector. I have one in the kitchen within 20’ of the wood stove. Don’t know where I’m putting the second one yet. Maybe in the upstairs hallway. Need to go back and get two smoke detectors because I had one upstairs which was expired and missing another in the master bedroom.
Got my fire extinguisher and ash bucket with lid. Both required for inspection.
Still need to cut back a huge lilac bush that’s definitely within the 10’ rule. Will do tomorrow after work.
Inspector is coming out Friday afternoon. Will post with results. My only concern is the chimney height may not be 2’ above the roof on the main part of the house. Measured with a tape and looked like it was just under by about 3” at 10’. It was breezy and my tape kept folding in half at around the 9’ mark so I don’t know for sure. Left the ladder setup Incase the guy wants to attempt negotiating a 8/10 roof pitch. I’m pretty sure it will be raining again when he stops by. If I need to add another small section, it won’t be too hard but I’ll wait to see what he or she says.
So the inspector met my wife at the house this afternoon because I was working.
I don't have all the details but apparently he took a walk around for about five minutes and said I was missing a heat shield behind my double wall stove pipe. I'm already exceeding clearances by about 1 1/2" on the stove pipe. This heat shield needs to be on the wood beam behind the pipe.
He asked me to call him because he needs to ask me if I'm using double wall pipe. I guess he couldn't tell. Was hoping to burn this weekend but I'm afraid I won't have another chance to contact him until Monday.
kennyp2339
Minister of Fire
Gave the old timer a call back. Explained to him it was double wall. We’re good to burn.

Similar threads
- Replies
- 8
- Views
- 1K
- Replies
- 0
- Views
- 2K
- Replies
- 4
- Views
- 785
- Replies
- 20
- Views
- 2K