Making a decision...........Old stove....new stove....no stove...

  • Active since 1995, Hearth.com is THE place on the internet for free information and advice about wood stoves, pellet stoves and other energy saving equipment.

    We strive to provide opinions, articles, discussions and history related to Hearth Products and in a more general sense, energy issues.

    We promote the EFFICIENT, RESPONSIBLE, CLEAN and SAFE use of all fuels, whether renewable or fossil.

glassblastertoo

New Member
Oct 6, 2023
10
North Carolina
I'm 77 years old, living in a passive solar home I designed and built myself, starting in 1979. Prior to building the house (post and beam, using laminated conventional lumber & plywood...and wood cut from my property with my chainsaw...and driftwood lumber(likely South American, washed off of ships coming up the Atlantic Gulf Stream, then washing onto the beach in south FL), I purchased items I thought I would use in our NC home: I saw a big sale on wood stoves, and I purchased a Morso 1B and a 1BO. I still have them both. The 1BO was used for 2 years in a home we rented, and then installed in our 'new' home, in 1985. The brick mason I hired to build our chimney (10,000 brick) was a drunk, recommended to me by a local chimney sweep (!). He was very good, when sober, but not any more knowledgeable regarding wood stoves than I was: The Scandinavian stove had a 4 3/4" exiting pipe, and he built my chimney with 8"x8" square flue tile. all the way up until he ran out, and then put a joint of 6" x 6" at the top. I found this out just before final inspection, and the previously mentioned chimney sweep helped me chisel out the 6" flue section and replace it with a piece of 8". The stove was hooked up to a 6" thimble into the 8" flue.

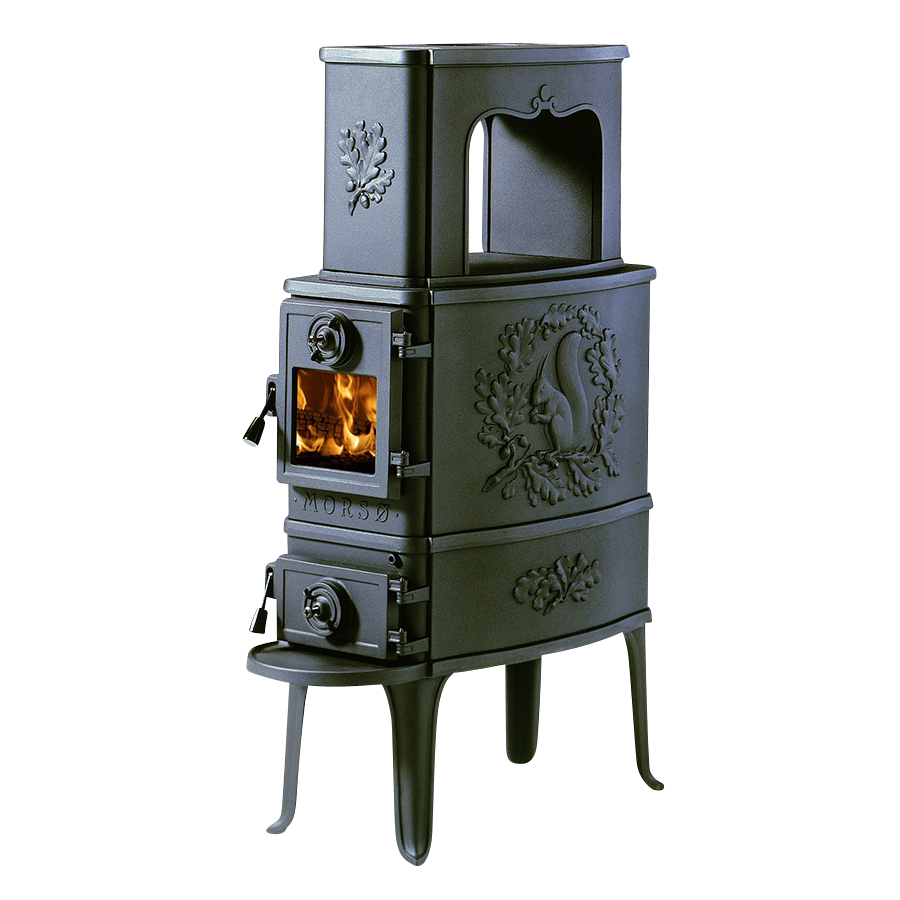
Now, 38 years later, we are where we are today: A chimney sweep company has informed me that I have stage 3 creosote (They have told me I likely had a small chimney fire sometime in the past.), and recommend I have them remove the 8" tile and replace it with a 4" flexible insulated stainless steel liner. While writing this, I'm wondering about the effect of the draw of a 4" flue with a 4 3/4" exit from the stove? I've been quoted ("estimate"?) about $6500 for the job. Now, back to the stove: It's a gray enameled stove. I'll attach a photo. Over the years, the "double-wall" interior side walls have cracked and warped. No replacements are available, but I've seen one stove like mine "refurbished" with 1/2" steel plate in the place of the original cast iron sections, and another with firebrick lining the inside of the exterior walls. I'm wondering. Another factor is a crack I recently noticed on the exterior wall/end opposite the door. On the outside of the panel there is a roughened circle in the center of the piece. The cast iron has cracked from the outside edge of that panel inward about 6". There is about 1/16" of visible movement in the panel position, and light is visible when looking into the stove from the open door, while a flashlight is directed at the crack area. The stove was used all winter two winters ago, and there were no obvious problems with how it burned, other than the limitations of diminished space on how much wood could be fit into the stove. The end panel that is cracked is prevented from moving much by contact with the side "double-wall" panel. I wouldn't suggest using the stove in its current condition.

As I mentioned, I purchased a 1B as well as the 1BO. The 1B is the exact same stove as the 1BO, except for the enamel color and the top panel. If I can remove the top panels from the two stoves, and exchange them, then the top from the gray stove, with the openings for the mounting of the heat exchanger, would allow the stove to operate as a 1BO. The box end of the 1B could also be exchanged with the cracked end piece from the 1BO. I believe there is an interior horizontal cast iron panel that directs the smoke/exhaust differently in the two stoves, which can also be exchanged in the two stoves. If that could be achieved (I'm not sure how much trouble would be likely encountered to dismantle both stoves.) I believe I could end up with a working 1BO with a black enameled back end, a black top, and the rest in gray enamel. Of course, it's also possible that I could dismantle the one with the cracked end, and get it welded, and put it all back together? I do hot glass work, and I've read that when welding cast iron it is a good idea to take the welded piece and immediately place it into a hot oven to be heated/annealed/cooled slowly to remove stress created by the welding. I happen to have large kilns to melt/anneal my glass work, and it seems like that might be a simpler option? But then we get back to my wondering about the 4" flexible flue working with a 4 3/4" stove exit. And wondering if I should just do without a wood stove. (I actually enjoy cutting/splitting firewood, and my wife of 53 years enjoys the radiant heat from the wood stove.) Any input would be appreciated.

1bo_frit.jpg
 
Contact Woodman's for parts. The sell the interior side burn plates and baffle.
 
Thanks for the link. The side burn plates will cost more than what I bought the whole stove for in 1979! Of course, in 1972 I bought a new VW van for $3500.00. Things have changed......... Now I just have to figure out what to do with the back panel of the box...and how well the stove will work with a 4" liner.......
 
Use an insulated 5" liner.
 
Will you be needing the stove this winter?

The chimney needs a liner if you want to burn wood. If I had time I’d be tempted to dismantle the cracked stove and piece something back together. But realize rebuilding cast iron stoves is not super simple task. Enamel is easily chipped (if that matter to you) joints need cemented together. Old rusty bolts will snap and require drilling and tapping.

I’d also be tempted by a new heatpump. Heat (and cooling) at the push of a button.

I think you need to make a decision about the stoves before you do the liner. Because most new stove require a 6” liner. I’m not aware of any new stoves that can be installed to a 5”.
 
Use an insulated 5" liner.
The chimney folks tell me that a 4" liner is the largest that can be installed because of the 90 degree bend necessary to exit the thimble. I wonder if the chimney brick at the point the thimble is located could be cut vertically, removing enough of the current flue so that the newly installed stainless steel liner could be bent in a curve ending at the thimble height, allowing the new liner to match up with the stove pipe. Thoughts?
 
The chimney folks tell me that a 4" liner is the largest that can be installed because of the 90 degree bend necessary to exit the thimble. I wonder if the chimney brick at the point the thimble is located could be cut vertically, removing enough of the current flue so that the newly installed stainless steel liner could be bent in a curve ending at the thimble height, allowing the new liner to match up with the stove pipe. Thoughts?
A Tee snout connector is generally used. The vertical part is attached to the liner and sent down and the horizontal part then attaches via a band clamp. Unless the chimney get narrow a 5” insulated liner and a T should fit.

799CA883-5CA7-4C6B-8D1A-4D6C61ED909A.png
 
Last edited:
BTW, the original Morso with a heat exhanger is a known creosote producer if not used correctly with dry wood. They were not designed for long slow burns with the air cranked way down. They were built for a quick fire that went out at night and restarted in the AM. I have the Jotul 606 with similar characteristics that Jotul pulled from the US market because of the creosote issues caused by misoperation.
 
Interesting to hear you say that. We burned only hardwood, dry, oak and hickory mostly. Never pine. We burned it with medium range temps in the pipe exiting the heat exchanger, ran a load before shutdown at night until there were just some good, glowing, coals left in the box, then banked them to the rear of the box and shut the air control down. We usually had enough coals in the morning to start the fire up again. It sounds like the Morso was removed from the US market for similar reasons your Jotul was, and why they were running the big sale on them when I purchased those I have. We ran the 1B for 6 years in an upstairs one-room apartment with no problems, until we moved into our house and hooked up the 1BO.
A Tee snout connector is generally used. The vertical part is attached to the liner and sent down and the horizontal part then attaches via a band clamp. Unless the chimney get narrow a 5” insulated liner and a T should fit.

View attachment 316410
The chimney flue as is has 8" OD square flue tiles, 7" ID. With the tiles removed, it seems that the diagonal dimension (11") would allow the use of the T-snout connector. I'll talk to the local chimney folks.
 
The Morse 2b classic with exchanger is still listed on the US Morso site. At over 75% HHV efficiency it qualifies for the tax credit.
 
We've finally taken our 1BO apart, from the bottom up. I see no reason to separate the two box bottom pieces, or remove the legs. It was a little tricky, figuring the sequence of which parts to dismantle first, and it worked well having my wife to help. (We're proud of our success: two 77 year-olds can learn new things!) It was actually pretty easy getting the nuts/bolts loosened up, using a penetrating oil, and we had no breakage. Now comes a difficult step: repairing the cracked rear end. I've read up online about welding cast iron, and I have a neighbor who has a business that requires him to do a number of different welding processes. I'm hopeful he will be able to help me in my project. Luckily, I do hot glass work for a living, and have computer-controlled ovens that will hold the size of the cracked panel easily. I'm planning to remove the porcelain enamel on the cracked piece by sandblasting it before the welding attempt, and after the repair, if all goes well, I'm wondering about the possibility of being successful trying to redo the enamel finish. Does anyone know if that could be done? I use colored enamels in my glass work, coating the exterior surfaces of 1/4" to 3/4" clear glass with fine powdered grit, and I know my supplier makes powders that are compatible with steel. After melting the glass, I use different processes to make decorative designs, sometimes manipulating the glass while it is soft in a kiln. I'm wondering if such processes could be used to create unusual enameled designs on the outer surface of stove panels. Any comments appreciated. I've always enjoyed trying new things.
 
Wow, if anyone has a chance of putting on new enamel, you probably do.
 
@D. Hermit Tagging you. Have you ever successfully repaired and enamel stove with a crack and had the enamel come out looking ok
 
I have not had any experience with trying to repair a cracked enameled stove panel. However, given the temperatures needed to weld cast iron, and the temperatures the enamels need to be melted at, I don't believe you could repair such a piece without destroying the enamel finish. (Plus, when the cast iron is welded, the glass enamels would be guaranteed to melt, and would likely contaminate the weld, which is why I'm planning to remove all enamel before welding.) When two materials are heated to the point at which they will fuse, the expansion properties must be close to the same, or both must be able to handle the stresses created when they shrink as they cool. Most enamels available that I use in my glass work, have a coefficient of expansion of 85 to 105. A difference of more than 5 units normally will cause failure after two different materials fuse. Glasses that are considered "soft" can be fused to some metals (copper/bronze), and there are some technical properties that allow very different materials to survive: I have made some glass pieces with small amounts of aluminum enclosed in borosillicate glass (Pyrex, very low expansion - 33), which should not have survived, but the crystal glass was thick enough, and shaped to spread the stresses across the item, that after careful cooling I never had problems with my products. The problem with enameling a stove panel is the constant changing of temperatures, and the expansion/shrinking of the metals and enamel glass. I've inquired of a few companies that have the technical experience to let me know if what I'm interested in doing is feasible, and I'll post what I find out.
 
  • Like
Reactions: EbS-P
One more thing: My stove panel that cracked opened up enough that one could see light coming through the crack. The crack traveled about half the width of the panel (about 6") and did not separate any further, I believe because of the fact that the panels on either side of the cracked panel were not allowing the metal to move much. The heat that was coming through the crack did affect the enamel on the outer surface of the panel: It deteriorated, with a resulting 4" x 8" oval area, centered in the 18.5" x 12" panel, being changed from a glossy finish to one more like sandpaper.
 
  • Like
Reactions: EbS-P
Thanks, I've seen that, but it isn't equivalent to the 1BO in BTU production, plus it uses a 6" flue.
Yes, cleaner burning. The BTU output is with different testing methods. The actual output will depend on the wood species and fuel load size.
 
@D. Hermit Tagging you. Have you ever successfully repaired and enamel stove with a crack and had the enamel come out looking ok
No. You cant weld through the enamel, you have to strip it off. Cracked enamel parts are basically a lost cause. There are some midwest shops that can redo enamel, but it generally costs more than its worth.

Your problem here is you have a bad back, and welds on a vintage morso back are not east to fix, and then actually hold. Generally if the back has been heated red hot so many times that it cracks, then it wont take a weld. Even to attempt it, you will need to sandblast all the enamel off of it first and get it down to bare iron. Drill stop, v-notch preheat, fill with nickel rod weld.

And then even if you do repair it, and its a horizontal crack, you want to keep a close eye on it that it doesn't spread completely across the back and you lose a corner or something.

Best course of action would be to find another donor stove with a good back and just use that one.
 
  • Like
Reactions: EbS-P
No. You cant weld through the enamel, you have to strip it off. Cracked enamel parts are basically a lost cause. There are some midwest shops that can redo enamel, but it generally costs more than its worth.

Your problem here is you have a bad back, and welds on a vintage morso back are not east to fix, and then actually hold. Generally if the back has been heated red hot so many times that it cracks, then it wont take a weld. Even to attempt it, you will need to sandblast all the enamel off of it first and get it down to bare iron. Drill stop, v-notch preheat, fill with nickel rod weld.

And then even if you do repair it, and its a horizontal crack, you want to keep a close eye on it that it doesn't spread completely across the back and you lose a corner or something.

Best course of action would be to find another donor stove with a good back and just use that one.
Most of what you've written is a repeat of my plans that I wrote in one of my previous posts. I am planning to sandblast the enamel off of the cast iron later today. My neighbor said he could bring his necessary welding equipment over to my place to do the welding (He's done several pieces of cast iron in the past.), and I will preheat the panel in one of my ovens before welding, and then immediately after the welding is finished the piece can be loaded back into the oven and annealed to remove stresses, and cooled slowly so as to not induce stresses during that step. I'm not sure when the stove piece cracked, or why. It's possible a piece of firewood hit the back of the stove while in use, but I'm pretty sure it was never heated "red hot". We've used the stove for 40+ years. Everything I've read online suggests welding with the right rods, and annealing it afterward, will result in a finished panel that will be less likely to crack in the future. Annealed correctly - slow - results in a "more flexible, softer" molecular structure rearrangement of the cast iron. We will see..........

As far as the enameling goes: Enamels are created specifically for different tasks. The enamels I use in my glass work is made for decorative work, and will not survive if used in a product that needs to resist failure when subjected to "rough" use, resistant to impacts, etc. I found out there used to be a company in the Midwest that "restored" chipped products like enameled sinks, cast iron bathtubs, etc, but no more. I've got some feelers out, but I doubt anyone would sell me the small amount I'd need to repair one 12" x 20" panel. I'll likely just live with the back panel painted; no one will see it anyway.
 
I think the majority of the repair business for enamel has been replaced by the far less costly and easier to apply polymer based systems, obviously useless for high temps but it is pretty impressive to see how well a polymer based system can blend in and repair damage to enameled surfaces.
 
You're right about the polymer systems. When I built my passive solar home 40+ years ago, I traded my glass work for all of my plumbing needs with the owner of a business that refinished old/antique sinks and bathtubs. We ended up with two cast iron tubs and a cast iron pedestal sink, plus a very unusual, large, ceramic bathroom sink. They've held up very well, but I'm getting ready to have the tubs and the ceramic sink refinished again. I'm hopeful this will be the last time.