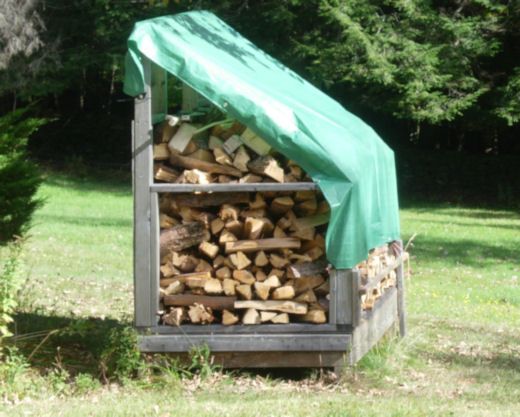
Experimental passive solar wood kilns

  • Active since 1995, Hearth.com is THE place on the internet for free information and advice about wood stoves, pellet stoves and other energy saving equipment.

    We strive to provide opinions, articles, discussions and history related to Hearth Products and in a more general sense, energy issues.

    We promote the EFFICIENT, RESPONSIBLE, CLEAN and SAFE use of all fuels, whether renewable or fossil.
Status
Not open for further replies.
You certainly have challenging conditions. You look like you are "all in" with this project, but I would suggest pulling back some chips and seeing how your current structures perform. For the blowing snow, you might get used lumber wrap and staple it all the way down to your pallets. You could add some kind of spacer if you want some air flow under the wrap and also leave the ends open to get some air flow. Most places just throw away the wrap and will let you have it if you don't mind pulling it out of their dumpsters. I only top cover my stacks, but blowing snow is not a problem here.
[Hearth.com] Experimental passive solar wood kilns
 
Lumber wrap is used for kiln dried lumber. If used on wood that is not completely dried, it might cause problems, especially if fastened up tight and the pile isn't off the ground. Otherwise, it's good stuff.
 
I only top cover my stacks, but blowing snow is not a problem here.
View attachment 171098
OT, but I often wonder how folks with stacks like this access the wood in a given stack? Doesn't look like enough room to pull a tractor with trailer down those aisles, so how do you do it?

I left 10 foot aisles between my stacks, which obviously eats up a LOT of space I'd rather have for stacking wood.
When it comes to firewood collecting, I'm in the minor leagues compared to you and many others on these sites. I cut on two properties within tractor distance of my home. I use my cub cadet tractor to get the wood back to my property where I process it with my SS and then transport it to my stacks using pull carts; I stage about 1/2 cord in my garage using either the pull cart or sports sled to get it from my stacks (100 feet from garage). I have seven pallet rows (~ 3 cord/row) and there is 42 inches between each row - just enough to easily get the pull cart through. Let me impress everyone with pictures of my equipment :). Collecting is a fun hobby even with modest tools; I did splurge on the SS this summer.
[Hearth.com] Experimental passive solar wood kilns [Hearth.com] Experimental passive solar wood kilns [Hearth.com] Experimental passive solar wood kilns
 
If you have 7 stacks at 3 cords/ea., then we have about the same amount of wood CSS'd! I'm at about 20 - 22 cords split, and maybe another 6 in rounds.

The primary difference between myself and some here isn't cordage on hand, but the time available for processing said cordage. Over three years, I was able to get about 22 cords stored, while also burning at least as much. So I was processing maybe 14 cords per year, and only taking maybe 5 - 6 days per year to do it. That included time to fell, drag out of woods, buck to rounds, haul home (10 miles), split, and stack.

Now, I've lost my helper and ambition to work as fast. I probably put a full day into each cord, by the time it's done. I'd guess I've dropped from 3 cords per day of work to just 1 cords per day, but I'm able to maintain those 22 cords at my current burn rate.
 
Last edited:
If you have 7 stacks at 3 cords/ea., then we have about the same amount of wood CSS'd! I'm at about 20 - 22 cords split, and maybe another 6 in rounds.
If my memory is correct, I think I saw a picture of you on a nice tractor pulling some huge log. So, I was really talking about big league equipment; I've seen some really nice equipment on these sites. The only equipment I own that I consider good is my SS; even if it is a bit polarizing. I began collecting when propane spiked to $4/gallon and was rationed a couple winters ago. That winter I cut dead standing and burned some CWF bricks to make it through - didn't want to do that again. Now I just try to keep stacking so I never need to concern myself about how dry the wood is regardless of species. Your productivity is better than mine; but I do have a lot of time and just plug away.
 
My abortive attempt to use 1x2 batten as structural elements is completed. Still fiddling with the next roofing system, put the 1x2 batten to work as curtain rods for roman style curtains. i didn't want to work the plastic too hard at these temperatures, but when I am working with green wood and want good airflow this should work.

What I did was drill a hole in both ends of each batten and bend on a half fathom of 550 cord. Batten is 8 feet, my untrimmed plastic is 10 feet wide. I rolled under rather than over so rain will roll right off, condensate on the inside surface of the plastic will end up in the scroll.

Might need to be fastened a bit more securely, but this held just fine for several minutes. As above, for maximal airflow I can roll it quite a bit further up and still be top covered.

[Hearth.com] Experimental passive solar wood kilns


[Hearth.com] Experimental passive solar wood kilns
 
This is an interesting project, but are you still convinced this is the easy way to season your wood and keep it dry? Aside from the effort of building these things, and stacking in them, how often will you be replacing the plastic?
 
This is an interesting project, but are you still convinced this is the easy way to season your wood and keep it dry? Aside from the effort of building these things, and stacking in them, how often will you be replacing the plastic?

I took two days off the project to think about it after HarvestMan suggested I pull back some of my chips. I am still all in.

#1, pallets off the ground is just barely enough airflow to get my wood dry enough, but the damn pallets break. I am DONE with pallets. So minimum 2x4 framed platforms, yup all in, building those.

#2, Restacking. DONE. No more restacking. I am putting green wood in there, playing with the curtain rods and watching wetbulb thermometers over the summer. During burn season, I am going to pull clean dry mold free wood out of these one face cord at a time into the garage. Every twelve hours I will be loading the stove from the garage without having to go out in the cold in my boxers and flip flops for another arm load of wood.

#3 stacking in them, this is the biggest problem I have right now. The roof hoops on the one I am building is going to be different from the last one specifically to facilitate easy filling.

Plastic life span, I dunno. I am confident I can get 12 months if I start in the spring. If I can get two years out of some of them, great. I am using 3.5mil "clear" sheeting from H-D, $25 for two pieces 25x10 feet each. I get a big enough scrap off each roll to use as a module end cap, or as a vapor barrier in the flooring of the next module built.

Hoop green house roof clips is a subject i might as well touch on. I googled a bunch and I have to go now. BRB, relatively.
 
I took two days off the project to think about it after HarvestMan suggested I pull back some of my chips. I am still all in.
I like how you handled making the decision. Giving pause to consider the path you are on is something most people never do. I'm guessing your dedication will be rewarded with results that will improve your burning situation in the next year(s). Looking forward to seeing the completed project and your results.
 
Hoop green house roof clips is a subject i might as well touch on. I googled a bunch and I have to go now. BRB, relatively.

There doesn't seem to be a single product for holding the plastic sheet onto the hoops that is uniformly praised by experienced hoop house owners. The owners all seem to gripe either about the clips coming off the hoops, or how much they spent on the clips.

The most expensive clip holder I can get without having to pay shipping are the large size binder clips from Office Max, they are labeled to hold 120 sheets each and are setting me back about a buck each. I am using four on each corner hoop, 16 clips per module, 1/2" PVC hoops.

It seems to be enough. I have stood out in the wind with module two after it was covered, forecast for gusts to 25mph, felt gusts i thought were closer to 30mph and saw 35mph gusts recorded by NWS overnight the next morning. The gusts were hard enough to get the top of the verticals on module two to deflect a solid inch, it looked like the upwind corner of the floor was getting light on the cinderblock..the gust ended, the unit snapped back to square. No popped clips, no torn plastic, and this at -15dF.

I am sure in strong enough weather either the clips will let go or the plastic will tear. For now what I have is strong enough.

FWIW I saved about $4000 last year off the oil bill by burning wood. Investing some of that savings into improving my cord wood infrastructure seems like a good idea, esp knowing that oil prices will go back up some day.
 
Not trying to dissuade you at all, but on the pallet breakage, you must be doing something different than me. I'm stacking 6 feet of fresh oak on 48" X 40" pallets, so roughly 3350 lb per pallet, and they never break on me. I'm also stacking on a slight hill, so one edge of the pallet is elevated on bricks or pavers. With one on each corner and a third in the middle, the pallets easily last a three year seasoning cycle or two.
 
Not trying to dissuade you at all, but on the pallet breakage, you must be doing something different than me. I'm stacking 6 feet of fresh oak on 48" X 40" pallets, so roughly 3350 lb per pallet, and they never break on me. I'm also stacking on a slight hill, so one edge of the pallet is elevated on bricks or pavers. With one on each corner and a third in the middle, the pallets easily last a three year seasoning cycle or two.

The third in the middle is the key difference. I also don't have any break. They will rot if they are lying on the ground.
 
I have half a cinder block under each corner of every pallet.

Started out using splits of cordwood when I Iifted the pallets out of the dirt, looked kinda trashy.

Besides a third cinder block under the middle, another option would be to tack PT 2x4 on the outside edge of each pallet if a fella liked running a hammer more than a shovel, money would be about the same. Another option would be to lay used RR ties on grade, level those when the ground is thawed. Pair of RR ties 42" apart will support two pallets with no breakage loaded to 2200# for many years. After many years when the pallets break, the RR ties will be barely warmed up.

Done with it. My favorite elective in college was Archaeology Field School, got the shovel edges to prove it, but banging out square flat bottom holes and leveling the bottoms of all those holes to each other is not that much fun.

I looked seriously into building one large kiln to handle nine cords at once. On a 12x24 footprint with the wood stacked 8' tall... I would have to build a foundation for 50,000# including anticipated snow load and my soil only supports 1000# per sqft. So minimum 50sqft of footing under 288sqft of floor, I haven't saved enough on the oil bill to think about that too serious and it will never be easy to get that much wood in and out of a floorplan that small.

One of the unique things about my location is the ground is so darn soft. 2,3 and 4 thousand pound per sqft ratings are not uncommon in the lower 48, I am on a mix of sand and glacial silt. If your ground can handle 3000# per sqft you can put three tractor trailers, loaded, on the footings I need for nine cords of wood with snow on top.

Or I can build a thing that is allowed to move around on it's piers...

Don't mind the side discussions. I have put a lot of thought into getting the cleanest driest wood I can out of whatever I build. I am looking for a multicord stash of mold free splits at 12% MC per electronic gizmo seven months from now, and I want the same structure to keep all that stash dry and mold free for however long it takes me to burn it without re-stacking.
 
Definitely a challenging environment!
 
I started to build one, a small one based on an old 4x8 stair landing my sister replaced at her house. I built the frame then got lazy, but now I threw a tarp over it and it has excellent southern sun exposure, and is open E/W for ventilation. Original plan was more ambitious but it's something anyway.
Stacked loose, it probably only holds a little over a half cord.

 
Last edited:
I started to build one, a small one based on an old 4x8 stair landing my sister replaced at her house. I built the frame then got lazy, but now I threw a tarp over it and it has excellent southern sun exposure, and is open E/W for ventilation. Original plan was more ambitious but it's something anyway.
Stacked loose, it probably only holds a little over a half cord.

I tried a similar thing when I still had pallets directly on the ground. Stacked loose i had a pile 4 wide by 4 tall, about 20 feet long. I covered top and south side more or less as above, it worked ok. It worked noticeably better when I covered the east and west end also, leaving just the north side open. I do have consistent twilight breezes since I am between a river and a ridge, breeze out of the east in the AM and out of the west in the PM. I think at my location I was getting enough breeze at the twilights to turn the air over, but capping the ends let a little more heat build up in the wood.

Also, for other far northern folks, appearance/ wife approval factor is a significant driver of this project. If I had enough room behind the garage out of sight of the house I probably wouldn't do this. If I had enough acreage to hide my woodpile I would do elevated pallets, parallel stacks, and then cover top and most of each side with wide plastic, like 10-12 feet wide so the plastic would reach from about knee high on one side, over the top and back down to knee height on the other side. Get some plywood scraps or etc under the plastic at the top of the stack so water doesn't puddle, throw some old tires up there to hold the plastic down and forget about building all this mess.

Long about March pull enough wood off for the rest of the season, re-stack that somewhere that it won't pick up any moisture during the melt before burn season ends, and spend money like this on upgrading your fishing boat.

It'll be an ugly pile, but it will work good, and be cheap. Just the wife won't like looking at it all year probably.
 
There doesn't seem to be a single product for holding the plastic sheet onto the hoops that is uniformly praised by experienced hoop house owner

My worry about your hoop-houses is that logs may "fall" and damage the plastic (as compared to a wider poly-tunnel, or an even wider multi-span polytunnel used more like a barn but with solar drying :) )

That apart, I wonder if this would work instead of clips?

Over this side of the pond I see tunnels (more often cloches, but I've also seen it on single-hoop tunnels) with a string / thin-rope attached from the base of the hoop on one side to the base of the adjacent hoop on the other side i/e/ diagonally across the plastic between two hoops. One advantage of this, when growing crops, is that the plastic can be slid up, under the rope, to provide ventilation and due to tension in the rope it stays in place until pulled back down again.

My Googling failed to find a good photo, but hopefully this one demonstates the idea

[Hearth.com] Experimental passive solar wood kilns
 
  • Like
Reactions: Poindexter
My worry about your hoop-houses is that logs may "fall" and damage the plastic (as compared to a wider poly-tunnel, or an even wider multi-span polytunnel used more like a barn but with solar drying :) )

Well, you earned a "P" for prescient there. See below.

That apart, I wonder if this would work instead of clips?

Over this side of the pond I see tunnels (more often cloches, but I've also seen it on single-hoop tunnels) with a string / thin-rope attached from the base of the hoop on one side to the base of the adjacent hoop on the other side i/e/ diagonally across the plastic between two hoops. One advantage of this, when growing crops, is that the plastic can be slid up, under the rope, to provide ventilation and due to tension in the rope it stays in place until pulled back down again.

My Googling failed to find a good photo, but hopefully this one demonstates the idea

I may try building one of those just for the heck of it.
 
So I got module two filled today. Pretty nice spruce. I brought some of it indoors to meter tomorrow or the next day, I am guessing 16-18%MC, it's really light.

[Hearth.com] Experimental passive solar wood kilns


Lots of wasted space up top. I meant for the easy splits to end below the rim of the headache bar 2x4 so if the ones I put in from up on the ladder get to shifting they won't fall down and tear my plastic. The ones pic'd below on the right follow the plan, the ones on the left show the risk of being over enthused, as @Kristen predicted.

[Hearth.com] Experimental passive solar wood kilns


Lots of wasted space in the top. I think the bunk bed style shelf like I put in module four (see posts 64 & 73 above) is the way to go for both best use of space and minimal risk of shifting logs tearing the membrane.

I did fit 0.82 cords in there. I have been reticent to predict how much I could fit, it comes down to how much wood fits in cross ways at the top.
 
I did account for the canary. Here is a pic with me standing in future #3 looking west into the south end of #2. That yellow X? That area will never get any direct sunlight on it. Once three is built and full it will be shaded all morning, shaded by its neighbors to the south at mid day, and never any afternoon sun in the shade of its neighbors to the west. This is going to be the wettest wood in my stacks.

[Hearth.com] Experimental passive solar wood kilns


So I built the wee boxes. You can kinda sorta see them in the previous post if you enlarge it and look real real careful maybe. Before I build and fill three I got to drill (and likely weigh) the splits in each of the canary cages on the east side, and then run 550 cord through the drilled holes in the canaries and out the single canary cage on the west side.

Long about July 4th or so I'll tug the canaries out from under the stack from the other side to see how I am doing MC wise.
 
Covered the south end of two and left just a little scrap edge on the big piece....

[Hearth.com] Experimental passive solar wood kilns


So most of the extra from my ten foot wide plastic covering my eight foot module ended up on the north end...

[Hearth.com] Experimental passive solar wood kilns


When i get module one built to the north of module two (this one) I am going to try to connect them thermally via overlapping roofing plastic so I'll have a single convection unit 42 inches wide and 16 feet long, instead of 2 8 foot units.
 
I need to give a shout out @Knots

This. for the most part the sun would extract the moisture from the wood during the day, and then when the glass cooled at night the moisture would condense and it would "rain" inside.

I too have had water drip off the ceiling onto me when visiting commercial greenhouses. That won't do.

The Wife Approval Factor (WAF) on the semicircular roof cross section (like a Quonset hut) was very low.

I can have shipped in special greenhouse plastics in custom cut sizes with a coating on the inside that is supposed to help water droplets flow instead of falling. I might have to upgrade the cheap Home Depot plastic I am using for now in the future, but I needed a different solution. Plus, I figured the commercial greenhouses are using it already and it doesn't work great on semicircular roof cross section. Also, the membrane offerings I see have a bunch of UV blockers in them. I want to let UV through to heat up the wood. I am building a darn greenhouse, not raising orchids.

There are essentially three categories of Gothic arch. The classic standard is as wide as it is tall. There are 'fat' ones, wider than they are tall, often called Tudor style, like this one: http://www.hoopbenders.net/ . WAF on the fat one was low, but you could cram a lot of wood in there if your wife can live with it. If you are going to use schedule 40 PVC for that you will probably have to heat the hoops (outdoors) and bend them on a jig, but you could use straight pieces for the legs.

Classic or equilateral style Gothic arch cross section, exactly as tall as wide, as thoroughly explicated on wikipedia, got a moderate WAF. https://en.wikipedia.org/wiki/Gothic_architecture#Equilateral_arch

So I ended up with a skinny Gothic arch cross section, taller than it is wide, and a high WAF. Now I just got to figure out how to use the space efficiently. Hopefully, with the flattest part of ceiling having a 12:12 pitch I'll get condensation running down the plastic rather than dripping back onto my wood.
 
you earned a "P" for prescient there

Sorry about that :(

I too have had water drip off the ceiling onto me when visiting commercial greenhouses. That won't do

I'm not sure that matters, although I'm no expert. Whilst I expect that it is better avoided, the condensation on the plastic is from water that has escaped from the middle of the log. It drips down onto the surface of the pile, and evaporates again (tomorrow); I am doubting that any/much is reabsorbed, not back into the centre of the log and nothing like as much as escaped from the polytunnel, and I think that only in an overcast, damp, weather period might it be reabsorbed at all - but then the next sunny period will re-evaporate it. It won't take much sun, with a polytunnel, to raise the temperature enough for that, and with a through-draught that water vapour will escape.

My barn is not the same in terms of "solar oven", but it has a tin roof which gets very cold (relatively) and that causes condensation. Never noticed it being a problem with logs on top being "wet", but I do have good through-draught in my barn.

Thought: Put a container on top of the pile and catch the condensation. I guess you would need a funnel and a bottle, rather than a tray, so that it doesn't re-evaporate easily. I know what you mean about greenhouse "rain", but I don't think it will amount to much. Happy to be proven wrong though :)
 
Status
Not open for further replies.