Chimney Liner needed with new BK Sirocco?

  • Active since 1995, Hearth.com is THE place on the internet for free information and advice about wood stoves, pellet stoves and other energy saving equipment.

    We strive to provide opinions, articles, discussions and history related to Hearth Products and in a more general sense, energy issues.

    We promote the EFFICIENT, RESPONSIBLE, CLEAN and SAFE use of all fuels, whether renewable or fossil.

chichas

Member
Dec 9, 2013
43
Free State of Idaho!
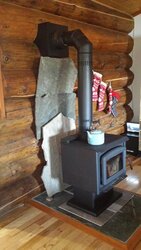
I replaced an old stove on the upper level of my house with a BK Sirocco 20 back at the end of October, right before rainy season in my area.
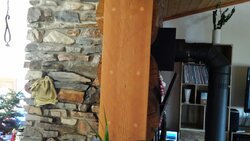
A couple weeks later we noticed liquid creosote seeping from the from between the rocks the chimney is built from at the same level where the bottom of the flue is located. Chimney is inside the house between kitchen area and the living room. Only the top 3-4 feet is in the open air on the roof.
I was thinking that I had water coming down the top of the flue and I installed a chimney cap but that didn't help. Then the other night my downstairs stove, also a Sirocco 20 but 3 years old leaked a crap ton of liquid creosote out from all the pipe seams. I discovered that I had installed the pipes upside down. yeah I know.. whole other story.
What this made me realize, along with my smart wife and an internet search, is that the moisture leaking out my chimney on the upper level is most likely from condensation being created in the chimney from the low burns.
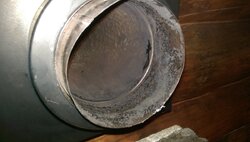
So, I think the way to resolve this is to install a liner in the flu space. My issue on this is that I can't figure out how to disassemble the wall thimble in order to take measurements and replace snout that would mate up to the tee.
Any thoughts on how that thing comes apart? Also, my flue liner is 11X8 oval liner that is 1" thick. Will a 6" round liner work or does it need to oval also?
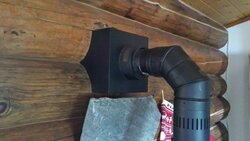
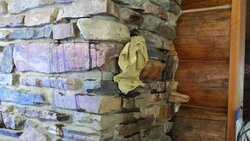
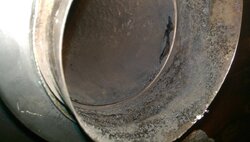
 

Attachments

  • Chimney Liner needed with new BK Sirocco?
    20171223_100053_2.jpeg
    88.8 KB · Views: 380
  • Chimney Liner needed with new BK Sirocco?
    20171223_100101_2.jpeg
    97.7 KB · Views: 367
  • Chimney Liner needed with new BK Sirocco?
    20171223_100111_2.jpeg
    111.3 KB · Views: 420
  • Chimney Liner needed with new BK Sirocco?
    20171223_100203_2.jpeg
    147.7 KB · Views: 351
Venting a BK into a clay flue is going to make exciting amounts of creosote, especially come shoulder season. I would either start sweeping that chimney weekly, or stop burning it until you get an insulated liner installed.

You should also inspect it with a camera to make sure it's not full of glaze that you can't brush out.

I very rarely tell people "call a chimney sweep", but you might want to.
 
The thimble isn't supposed to come apart. You can disconnect the stovepipe and look in the thimble.

HomeinPA, if it doesn't come apart, then does that mean it isn't secured in any way via screws/nails to framing/logs? Sure seems like it is and the previous owner recalls securing it somhow, he can't really remember as he installed it in 1990's. How would I remove it in order to install the snout into the tee at the bottom of a new liner?
 
That is weird, the creosote coming out of the rocks. Something seems off and possibly in a dangerous way.

Is it coming out of the rocks or running down from the top? It looks like it’s coming out.
it's coming out at the level of bottom of the flue, not from the ceiling. I pulled the pipe and cleaned it out and there was a pile of wet ash/creosote in the bottom of the flue.
 
For starters, I'm not sure they make a stove big enough to heat that place based on picture #3 and seeing that the entire wall is missing on the end of one of the rooms!

#2 - That almost looks like a class-a thimble that would be attached to a class-a chimney. Am I missing something? Someone referred to venting into a clay chimney liner but I don't see that setup. If it's class-a chimney then you don't need a liner, you need to burn the stove correctly and clean it correctly. And what about a chimney cap, do you have one to keep rain out? Maybe a picture of your exterior chimney and top of the chase would help.

If it's class-a then the black metal shroud over the thimble should come off but if it was put in there with adhesive or something you'll destroy it getting it out.
The label on the thimble says "Metalbestos Model SS II, HT Class Chimney, Part #6T-SB". From what I just read online, it's a Selkirk product. Too old though to find any actual info on it maybe. I'm not seeing anything.

It was me that mentioned the clay liner on the original post.:) That wall box is mounted in the logs and goes into the bottom of the flue. The flue from there up is just clay liner, no class a pipe which is the problem I believe. It's to large for the stove to run properly from what I've researched. The flue needs to match the 6" outlet on the stove up through the chimney from what I'm finding.

The thing I’m confused about is the masonry should be lined and sealed. There should not be any way for creosote to leak out?!?!

Also you can go from 6” into a larger masonry chimney and have it work just fine. There is a certain percentage larger you can go. I can’t remember if it’s set by the stove manufacturer or if it’s just a standard measurement. In my case I have an Englander stove with a 6” flue and it goes into a 6”x9” masonry chimney and it was within the required size.
the bottom of the flue isn't lined or sealed in any way, just appears to be plain old cement/mortar. I don't know if your stove is catalyst type or not, maybe that's part of it. I did do some more reading and BK apparently recommends 6" all the way up.
 
Yes you need a liner but if the chimney is saturated bad enough you have creosote running down the ouside like that it may not be able to be made safe. You really need a good professional to look at it.
 
Yes you need a liner but if the chimney is saturated bad enough you have creosote running down the ouside like that it may not be able to be made safe. You really need a good professional to look at it.

Thanks bholler, I do have someone coming out monday.

This problem only started once I swapped over the catalytic stove from an old non-cat stove that ran much hotter flue temps. The seepage only happens when running my BK on low thermostat settings. The moisture content of the exhaust on the BK is higher than the old stove I replaced.

What I can't seem to get answer on though is how do I get that wall thimble box out/apart so that I can install an insulted liner once I get the flue cleaned up.
 
Does the outside of the chimney have a clean out?
More then likely the chimney pro you call is going to have to rip the whole through the wall kit out just to have access aid in cleaning (chemical cleaning) install a new insulated liner with a T, then a new through the wall kit with a piece of class a pipe to make the transition from the outside to the inside of the home. This could become a bigger job, and could be expensive like 2-3g's with the cleaning, materials and labor.
 
Thanks bholler, I do have someone coming out monday.

This problem only started once I swapped over the catalytic stove from an old non-cat stove that ran much hotter flue temps. The seepage only happens when running my BK on low thermostat settings. The moisture content of the exhaust on the BK is higher than the old stove I replaced.

What I can't seem to get answer on though is how do I get that wall thimble box out/apart so that I can install an insulted liner once I get the flue cleaned up.
It has to come apart some how. But i dont know how that specific one does. The sweep may have some idea. And what i am concerned about is that if it is that saturatedci dont see anyway to really get the chimney clean. I honestly have never see one that bad.
 
Does the outside of the chimney have a clean out?
More then likely the chimney pro you call is going to have to rip the whole through the wall kit out just to have access aid in cleaning (chemical cleaning) install a new insulated liner with a T, then a new through the wall kit with a piece of class a pipe to make the transition from the outside to the inside of the home. This could become a bigger job, and could be expensive like 2-3g's with the cleaning, materials and labor.

No clean out, just the opening though the thimble for cleaning out the bottom of the flue which is how the previous owner/builder of he home did it. I was able reach in to clean out as well without much trouble.

The chimney is inside the house between kitchen and living room, not sure what you mean by 'transition from outside to inside'. Only the top 3-4 feet is outside the home in the elements.
 
Here's an example of the connector I'm looking at: https://www.rockfordchimneysupply.com/short-body-tee-with-22-in-snout.php

That snout piece has to come through the wall thimble, correct?
Are you installing a liner with the T or just trying to run the takeoff into the chimney? The installation I see has used a piece of class-A chimney for a connector to a terracotta chimney which....me thinks is a bit wrong but..... When using a T, the takeoff slides inside the crock and is drawn tight against the T body. You shouldn't be planning on removing the class-A pipe from what I can see.
 
Are you installing a liner with the T or just trying to run the takeoff into the chimney? The installation I see has used a piece of class-A chimney for a connector to a terracotta chimney which....me thinks is a bit wrong but..... When using a T, the takeoff slides inside the crock and is drawn tight against the T body. You shouldn't be planning on removing the class-A pipe from what I can see.
so you are saying the snout piece should just slide inside the thimble? That would be great if that's the case. Would really make things easy.
Not sure what the takeoff is. Is that what you are calling the pipe that is inside the wall thimble and I'm connecting the pipe from my stove too?
I'm going to remove the pipe connecting the stove to thimble here in a bit. I'll measure the pipe diameter in the thimble and maybe post a pic if anything looks off.
 
Yes. The takeoff is the piece that you attach to the vertical T base. I don't know what you're going to accomplish though. You already have a 6" connector so a 6" piece of rigid pipe is not going to slide back inside it. The diameter of the current pipe would need to be at least 7 inches for the 6" pipe to slide all the way in. What is the end game here? What is the purpose of sliding the pipe inside the thimble? It doesn't accomplish anything if it isn't connected to a T and lining system. The problem would appear to be the overall installation and maintenance, not the connector.
 
Yes. The takeoff is the piece that you attach to the vertical T base. I don't know what you're going to accomplish though. You already have a 6" connector so a 6" piece of rigid pipe is not going to slide back inside it. The diameter of the current pipe would need to be at least 7 inches for the 6" pipe to slide all the way in. What is the end game here? What is the purpose of sliding the pipe inside the thimble? It doesn't accomplish anything if it isn't connected to a T and lining system. The problem would appear to be the overall installation and maintenance, not the connector.


What I'm trying to determine is how on earth you attach the snout to the tee. It sounds like that takeoff you refer to needs to be removed and the new snout/takeoff that mates up to the T put in it's place. Now were back to the original issue which how the heck does the wall thimble come apart? It has to. There would be no way to secure it when first installed without putting the box in place, screwing it into the surrounding wood and then inserting the snout/takeaway pipe.
 
What I'm trying to determine is how on earth you attach the snout to the tee. It sounds like that takeoff you refer to needs to be removed and the new snout/takeoff that mates up to the T put in it's place. Now were back to the original issue which how the heck does the wall thimble come apart? It has to. There would be no way to secure it when first installed without putting the box in place, screwing it into the surrounding wood and then inserting the snout/takeaway pipe.

Im confident the thimble comes apart. Have you taken off everything you can and looked to see what jumps out at you?
 
What I'm trying to determine is how on earth you attach the snout to the tee. It sounds like that takeoff you refer to needs to be removed and the new snout/takeoff that mates up to the T put in it's place. Now were back to the original issue which how the heck does the wall thimble come apart? It has to. There would be no way to secure it when first installed without putting the box in place, screwing it into the surrounding wood and then inserting the snout/takeaway pipe.

We're going round and round here. The takeoff is what a professional calls it. You're calling it a snout. It isn't really rocket science. The T comes down from the top of the flue with the liner attached. The "snout" goes in through the thimble, you line them up and tighten it together.

Once again I'll say that you don't need to disassemble the thimble in the living space unless you're going to replace it with a bigger model. In that case it's way more complicated. The "snout" you're considering is NOT to be used as a thimble replacement. It is strictly for relining an existing flue. Like I said last time, your description does not appear to be a properly installed (built to code) masonry chimney. You need a reputable professional who can come out and inspect the flue and find the problem and then provide you with a solution to bring it into code and in doing so, stop the leaking issues.
 
  • Like
Reactions: Doc C
We're going round and round here. The takeoff is what a professional calls it. You're calling it a snout. It isn't really rocket science. The T comes down from the top of the flue with the liner attached. The "snout" goes in through the thimble, you line them up and tighten it together.

Once again I'll say that you don't need to disassemble the thimble in the living space unless you're going to replace it with a bigger model. In that case it's way more complicated. The "snout" you're considering is NOT to be used as a thimble replacement. It is strictly for relining an existing flue. Like I said last time, your description does not appear to be a properly installed (built to code) masonry chimney. You need a reputable professional who can come out and inspect the flue and find the problem and then provide you with a solution to bring it into code and in doing so, stop the leaking issues.
yes, i understand. just clarifying that snout=takeoff . I'm here to learn and want to be able to clearly communicate with the experts here I'm seeking help from. I'm in no way thinking that it replaces the thimble. It has to pass through the thimble some how and get connected to the tee. That can't be done without removing the existing takeoff that is now in the thimble and replacing it with one meant for the T that will be on the bottom of the liner like the one shown in the link above unless someone can explain how to do that.

Message boards get confused quick:)
 
Last edited:
ok, after taking things apart and watching this video
To view this content we will need your consent to set third party cookies.
For more detailed information, see our cookies page.

what i think the previous owner did was stuff the takeoff pipe too far back into the thimble. It looks like it can be pulled out but would take some effort.

This would explain how previous owner was able to secure the box before inserting the takeoff pipe.

On another note, I've been running the stove 'hotter' by not turning down the thermostat the last couple days as far as I had been doing and have had no water/creosote seepage. Totally dry.
 

Attachments

  • Chimney Liner needed with new BK Sirocco?
    IMAG2744.jpg
    103.9 KB · Views: 109
  • Chimney Liner needed with new BK Sirocco?
    IMAG2743.jpg
    104.4 KB · Views: 135
Last edited:
I’m no expert, but sometimes the pipe is just slid into the clay thimble, and packed around with rope gasket.

A round insulated liner in an oval or rectangular clay liner is a non-issue, and in fact standard.

Beautiful house! What’s with the shielding behind the stove, are you not meeting prescribed clearances?