The Chimney Sweep Online Fireplace, Woodstove, Gas Stove and Barbecue Shop
The Chimney Sweep Online Fireplace, Woodstove, Gas Stove and Barbecue Shop
 | " Where a wood-burning fireplace insert is vented
|
Q: We're about to buy a new wood-burning fireplace insert, and our local dealer refuses to install it unless we buy a stainless steel liner that goes all the way out the top of the chimney. Do we really need to do this? If so, is it something we can do ourselves?
|
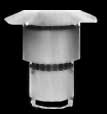 Rain Cap | To install our fireplace insert chimney liner kit, you'll need: *work gloves (the edges of the stainless parts are SHARP) *a cutting torch, offset grinder or sawzall to enlarge your fireplace's damper opening. *a caulking gun to apply the silicone sealant *sheet metal shears to trim off the excess stainless flex *a standard screwdriver to tighten the draw bands on the flue collar connector, top plate and rain cap |
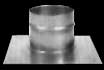 Top Plate | First, you need to remove the fireplace damper assembly or cut a 7" hole in it with a sawzall, offset grinder or cutting torch so the 6" flex pipe can pass through. |
|
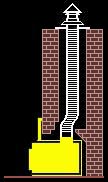
Flex Pipe | Slide the insert into the fireplace without attaching the surround panels, and carry all liner parts up onto the
roof. Attach the flue collar connector to the bottom of the stainless flex pipe by tightening the draw band
with a screwdriver, and lower this assembly down the chimney. Have your partner down below plug the
flue collar connector into the flue collar on the insert and tighten the draw band. Cut the excess flex pipe off at the top with sheet metal shears, leaving 4" protruding above the chimney crown or liner tile. Place the top plate assembly over the protruding flex pipe and affix it to the chimney top or flue tile with high-temp silicone sealant. Tighten the top plate's draw band around the flex pipe. Fit the rain cap over the stand-up collar on the top plate and tighten the cap's draw band. |
|
Flue Collar Connector | Down below, slide the insert forward a bit (the flex will allow some movement on the hearth), attach the surround panels, and push the insert back until the panels touch the fireplace facia. |

 You're required to reline a chimney for a woodstove or wood insert if the existing flue is oversized, unlined, or has a cracked or damaged liner. The big issue with fireplace
insert installations is flue oversizing: most fireplace flues are WAY too big to efficiently vent the exhaust coming out of the 6" or 8" flue collars on today's inserts. Installing the liner
eliminates flue oversizing violation, ensures the best possible insert performance, and eliminates the need to pull the insert out of the fireplace every time you clean the chimney. The job
doesn't really require much mechanical aptitude, and many of our online customers choose to do it themselves.
You're required to reline a chimney for a woodstove or wood insert if the existing flue is oversized, unlined, or has a cracked or damaged liner. The big issue with fireplace
insert installations is flue oversizing: most fireplace flues are WAY too big to efficiently vent the exhaust coming out of the 6" or 8" flue collars on today's inserts. Installing the liner
eliminates flue oversizing violation, ensures the best possible insert performance, and eliminates the need to pull the insert out of the fireplace every time you clean the chimney. The job
doesn't really require much mechanical aptitude, and many of our online customers choose to do it themselves.