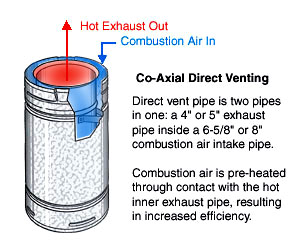
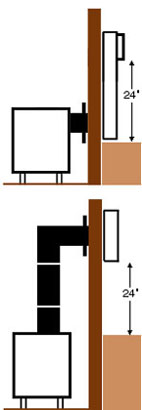
Unlike older gas stoves and fireplaces that required a vertical vent pipe or
chimney through the roof, Direct Vent models can simply be vented out an
adjacent outside wall. Most direct vent appliances, however, need some
vertical rise in the vent pipe for proper operation. Typically, a 24"
vertical length is required before the pipe turns and penetrates the wall,
but some stoves are listed with shorter rises or no rise at all.
Even stoves that require a vertical rise can be installed without any visible pipe inside the house using a Snorkel Cap, which creates a 24" rise
outside the wall.
Examples of Direct Venting Techniques:
|
|
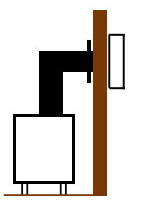 |
1: Direct Vent Installations
Through an Outside Wall
1) 24" Vertical Length
1) 90 Degree Elbow
1) 11"-14" Adjustable
Length
1) Wall Thimble Collar
1) Horizontal Vent Cap
This popular configuration is
available as a prepackaged
kit
|
|
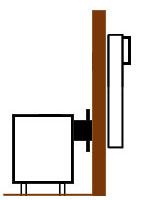 |
2: Snorkel Vent Installations
Through an Outside Wall
1) 11"-14" Adjustable Length
1) Wall Thimble Collar
1) Snorkel Vent Cap
The Snorkel Cap creates the rise
on the outside of the wall, so no
vent pipe is visible inside the house
|
|
|
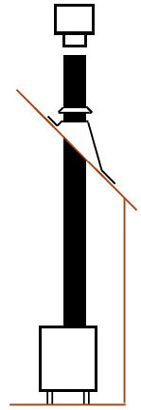
3: Basement Installations
Through an Outside Wall
To clear windblown debris
and snow
drifts, the bottom
edge of the vent cap
must be
24" above grade. If the top
of
the soil is low enough on
the wall, a
snorkel cap can
be used to accomplish
this.
If the top of the soil is too
high to
enable use of a
snorkel cap, vertical
lengths
can be added to the inside
vertical pipe, to raise the
bottom of
the standard cap
24" above grade.
Note: 2" clearance must be
maintained
between the
horizontal pipe and the
ceiling
|
|
|
|
| |
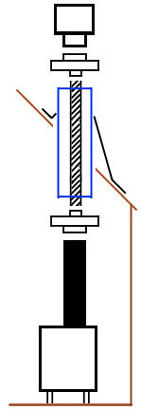
4: Vertical Venting
Through The Roof
If the stove is located on an inside
wall, or if
above the roof venting is
desired for any other
reason,
Direct Vent stoves and fireplaces
can
also be vented vertically, using
the same type of
roof flashing and
storm collar typically used for
wood stove chimneys.
A vertical coaxial cap is
substituted for the
horizontal cap
used in thru-wall installations.
|
|
|
|
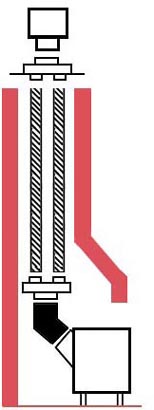
| | 5: Venting Into Unused
Manufactured Chimneys
Manufactured chimney
coaxial
conversion kits are
available for
most common
double-wall and
triple-wall
manufactured chimney
sizes. Round fittings are
attached
to the top and
bottom of the
chimney,
and connected by a
length
of 4" aluminum flex
liner.
The chimney cavity
around the liner is used to
deliver combustion air to
the
fire.
Coaxial Direct Vent Pipe is
used to
connect the stove
to the bottom fitting
|
|
|

| 6: . Venting Into Unused
Masonry Chimneys
Masonry chimney coaxial
conversion
kits consist of fittings
for the chimney
top and thimble
hole, connected by a
length of 4"
flexible aluminum liner.
The liner
carries the exhaust, while
the
flue cavity around the liner acts
as
the combustion air intake
passageway.
Coaxial Direct Vent Pipe is used
to
connect the stove to the thimble fitting.
|
|
|
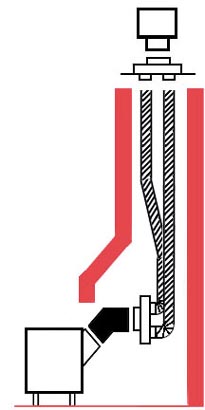
| | 7: Venting Into Fireplace Chimneys
Using a Co-Linear Direct Vent System
When a Direct Vent stove is installed standing inside or in front of an
existing fireplace, we can't use the masonry conversion kit shown in
diagram #5 above because we don't want incoming combustion air to flow
into the room through the fireplace opening. For fireplace installations, a
Co-linear intake/exhaust system is used. A co-linear converter box at the
bottom of the chimney is connected to a similar box at the top by two
lengths of 3" aluminum flex, one for intake and one for exhaust. A coaxial
rain cap completes the installation. With this system, combustion air is
contained within the intake flex so it can't enter the room through the
fireplace opening.
Note: The 3" aluminum liners are small enough to snake right through the
fireplace damper opening, and flexible enough to allow the bottom converter
box to be oriented sideways for rear-vent stoves.
|
|
|