The Chimney Sweep Online Fireplace, Woodstove, Gas Stove and Barbecue Shop

The Chimney Sweep Online Fireplace, Woodstove, Gas Stove and Barbecue Shop
STOVE DIMENSIONS: 22 3/8" WIDE X 18 1/2" DEEP X 26 1/8" TALL

CONNECTOR PIPE USED: 4"ID x 6 5/8" OD COAXIAL DIRECT VENT PIPE
   NO HEARTH (FLOOR PROTECTION) NEEDED ON A NON-COMBUSTIBLE OR WOOD FLOOR. WHEN INSTALLING
ON CARPET, VINYL OR ANY OTHER COMBUSTIBLE FLOORING OTHER THAN WOOD, A NON-COMBUSTIBLE
OR WOOD PANEL EXTENDING THE FULL WIDTH AND DEPTH OF THE STOVE MUST BE PROVIDED.
VENTING OPTIONS:
VERTICAL VENT: STRAIGHT UP (MAXIMUM 35 FT.) THROUGH FLASHING TO 6 5/8" ROUND CAP
DIRECT VENT: 9" VERTICAL PIPE TO 90 DEG. ELBOW THRU BACKWALL TO 13 1/2" SQUARE CAP
SNORKEL VENT: STRAIGHT BACK THRU WALL TO 13 1/2" WIDE X 28 1/2" TALL SNORKEL CAP

FLAT BACKWALL CORNER BASIC DIRECT VENT SNORKEL VENT
FLAT WALL INSTALLATIONS
| CORNER INSTALLATIONS
| |
A: STOVE TO BACKWALL IF VERTICAL/DIRECT VENTED........ 3" IF SNORKEL VENTED................ 3" | G: STOVE CORNERS TO CORNER WALLS....... 3" | |
B: STOVE TO SIDEWALL................ 4" | H: CENTERLINE OF VERTICAL PIPE TO CORNER WALLS................. 9-5/8" | |
C: CENTERLINE OF VERTICAL PIPE TO BACKWALL.................. 5-3/8" | I: CORNER TO CENTERLINE OF PIPE... 13-5/8" TO FRONT OF WINDOW............. 30-1/4" | |
D: CENTERLINE OF VERTICAL PIPE TO SIDEWALL................ 15-3/16" | M: FLOOR TO CENTERLINE OF EXHAUST PIPE IF DIRECT VENTED................... 41" IF SNORKEL VENTED.............. 22-3/4" | |
E: BACKWALL TO FRONT OF DOOR: IF VERTICAL/DIRECT VENTED....... 24" IF SNORKEL VENTED........... 18-5/8" | N: FLOOR TO TOP OF HORIZONTAL VENT CAP IF DIRECT VENTED............... 47-3/4" IF SNORKEL VENTED.................. 45" |
TOP OF STOVE TO OVERHANGING COMBUSTIBLES: 12" (MAXIMUM OVERHANG 14")

COMBUSTIBLE ALCOVE DIMENSIONS: MINIMUM 30-1/4" W, MAXIMUM 18" DEEP
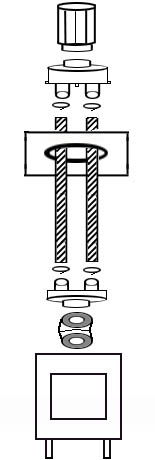
 | FIREPLACE HEARTH INSTALLATIONS:Determine the height of the chimney, and purchase enough 3" flexible aluminum liner to extend to the top of the chimney twice.Attach the two lengths of aluminum flex liner to the intake and exhaust ports on the top adapter box with pipe clamps or sheet metal screws and silicone sealant. Glue the top sealer plate to the chimney top with silicone sealant, and lower the two liner lengths through the opening. Anchor the top adapter box to the sealer plate with screws, and twist-lock the coaxial rain cap on top. Down below, use clamps or screws and silicone sealant to attach the two liner lengths to the bottom adapter box, which is used to connect the liners to a coaxial 45 degree elbow. The elbow then connects to the 45 degree flue collar on the stove.If the stove is to stand inside the fireplace, orient the 45 degree elbow so it points straight up, as shown in the diagram at upper right. If the stove is to stand out on the hearth in front of the fireplace opening as shown at lower right, orient the elbow so it points straight back to clear the lintel bar, then bend the liners forward to attach the adapter box. |
|
|
| NOTE: THIS DIRECT VENT GAS APPLIANCE COMES WITH DETAILED, STEP BY STEP INSTRUCTIONS FOR DO-IT-YOURSELF INSTALLATIONS. TO VALIDATE YOUR WARRANTY AND ENSURE OPTIMUM SAFETY AND PERFORMANCE, HOWEVER, FINAL SETUP ADJUSTMENTS AND INITIAL FIRING SHOULD BE ACCOMPLISHED BY A TRAINED GAS SERVICE TECHNICIAN. CONSULT YOUR GAS SUPPLY COMPANY FOR A LIST OF RECOMMENDED SERVICE TECHNICIANS IN YOUR AREA. |
