Does my Vigilant need a rebuild?

  • Active since 1995, Hearth.com is THE place on the internet for free information and advice about wood stoves, pellet stoves and other energy saving equipment.

    We strive to provide opinions, articles, discussions and history related to Hearth Products and in a more general sense, energy issues.

    We promote the EFFICIENT, RESPONSIBLE, CLEAN and SAFE use of all fuels, whether renewable or fossil.

Basketcase

New Member
May 14, 2019
15
New Hampshire
Hey all. I bought a house with a Vigilant stove last year. I burned it last winter and it worked well. It was better after I replaced all the door gaskets. How do I know if I need to take this thing apart and go through it? What exactly gets done when that happens?

Thanks for any info.
 
Hey all. I bought a house with a Vigilant stove last year. I burned it last winter and it worked well. It was better after I replaced all the door gaskets. How do I know if I need to take this thing apart and go through it? What exactly gets done when that happens?

Thanks for any info.
It's a good idea to do a seasonal inspection and test of the gaskets and bypass operation. Check the seams to see if they need resealing. Remove the chimney connector and clean the baffle system between the fireback and the back of the stove. Make sure all controls are working smoothly and correctly.
 
It's a good idea to do a seasonal inspection and test of the gaskets and bypass operation. Check the seams to see if they need resealing. Remove the chimney connector and clean the baffle system between the fireback and the back of the stove. Make sure all controls are working smoothly and correctly.

Thanks for your reply. Inspection revealed that I can see light around many of the seams. It appears that it may be time to break this thing down and reseal it. Doesn't seem like too bad of a job.
 
Moving this to the older VC forum for better guidance during the rebuild.
 
easy job. just put it back together the way you took it apart. make sure you get all the old cement that is left stuck on off. wet the seem and cement.
 
Hint, take pictures as you disassemble as a reference for reassembly.
 
  • Like
Reactions: VigilantBlue
Good idea. Is there anything I might need other than new tie rods and a couple tubes of Rutland black furnace cement? How many tubes? 2 be enough?
 
i usually buy it by the tub. cheaper but lots of left over. good smoke pipe reattach after clean out
 
It seems like the tube would be nice for a clean bead at the joints. How do you do it with the tub? I feel like I'd be wearing it everywhere. haha.
 
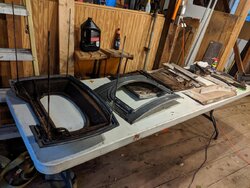
Well I got it all torn down. Figured I'd wait until I did this to order parts, just in case I needed something extra. The damper retainer was missing, but other than that it all looks good. It is crazy how much ash was packed into the passages behind the fireback and in the air tube. It had not been cleaned in a while I'd say. I've been slowly cleaning up the parts that fit in my blast cabinet. Once all my stuff shows up I can start reassembly. Seems really straight forward. I also found a great PDF with step by step rebuild instructions specifically for the Vigilant. That has been super helpful.


IMG_20191021_175659.jpg
 

Attachments

  • IMG_20191021_175652.jpg
    IMG_20191021_175652.jpg
    223 KB · Views: 264
I don't have any real experience with the vigilant but the big brother Defiant was well known for folks not cleaning out behind the fireback. There was a way to do it but not obvious to homeowner. if the space wasn't cleaned out it could lead to warped fireback.

Looks like you have the right gear for the rebuild. I did mine twice with a wire brush on a hand grinder.
 
Here's a question. Does the lower fireback get cemented into place? In the removal directions it says "Tap the lower fireback with the rubber mallet to break the cement seal holding it in place" but the installation portion of the directions only talk about cementing the ridge for coverplate B. It does not say to cement the whole seam for the lower fireback. Any insight?
 
i'm not sure but if it ask you to break the original cement i would cement it in. better yet when i did my defiant last i flat gasketed the fire back with flat gasket. not sure if you have the space. mine had just enough space and i gasketed everything for a tight seal and everything worked well. once i got a fire going for about a hour i could load more wood close the damper and light off the secondary and it burned smokeless
 
Thanks for the feedback. I know it said to break the cement seal, but I cant remember if there was any when I broke it down. I suppose it cant hurt to use some when I put it back in. Who knows if the last person did it correctly anyway. I'm sure I'm not the first to be in here.

Exterior casing is all sealed up and painted. I think it came out nice.

IMG_20191030_190344.jpg
 
  • Like
Reactions: peakbagger
Looks like a fine looking rebuild. Hopefully you have good very well ventilated space to season the stove paint. I have done both of my Defiant rebuilds in my basement as it was too heavy to easily move it one piece and its a very smoky experience. Lot to be said to firing it off temporarily in the driveway.
 
That did cross my mind. lol. Since it is across the driveway in the barn, it would not be hard to stop halfway and fire it off. Would one burn be enough to burn off the bulk of it?
 
I dont think there are hard and fast rules. My guess is fire it off slowly outdoors up to low temp, let it cool down and then light it off one more time and run it up to hot as you can get it. The problem is without a good stack attached to it its tough to get enough draw when in bypass so that area still is going to smoke to some extent when you do get it hooked up.
 
Thanks for the compliments. I used the Rutland stove paint. Rattle can. Really happy with it. Too windy to fire it off outside here today, so maybe tomorrow.
 
So the stove is performing quite well after the work. It is behaving totally differently than before. I think I was gun shy last year, because of how quickly it would get very hot with the damper open. I find myself closing the damper before it gets hot enough and it ends up running too cold. Once I get it right, it sits there and cruises for a couple of hours at around 450 at the griddle (using an IR gun). It was hard to maintain a constant temp before.

IMG_20191114_100216.jpg