Clearance Concerns

  • Active since 1995, Hearth.com is THE place on the internet for free information and advice about wood stoves, pellet stoves and other energy saving equipment.

    We strive to provide opinions, articles, discussions and history related to Hearth Products and in a more general sense, energy issues.

    We promote the EFFICIENT, RESPONSIBLE, CLEAN and SAFE use of all fuels, whether renewable or fossil.

Mike_W

New Member
Feb 7, 2019
2
Michigan
Hi all,

Im currently debating the best way to go about re-adding a fireplace to my house. At some point in its ownership the fireplace was drywalled in. I believe I have is a Heatform or heatilator. (https://www.hearth.com/talk/wiki/heatform/) perhaps someone with a better trained eye can tell.
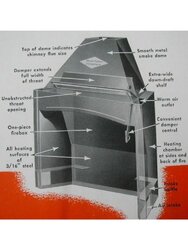
Heatilator.jpg
I have removed 8" of drywall and stud around the opening of the fireplace as I have seen this referenced (between 6-8") in many insert manuals. My plan now is to replace what was there with cement board and metal studs and eventually face with thin brick.

I have a few concerns im looking for guidance on:
1) There is ~1.5" airgap between my metal firebox and the face of the wall. Is this a concern? If so how should it be handled?
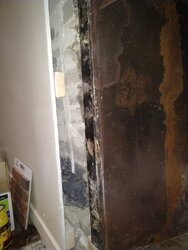
3724290981054563364.jpg

2) There are cavities without brick on each side of the heatform. I understand now that these may be air intakes. Can these be left alone?
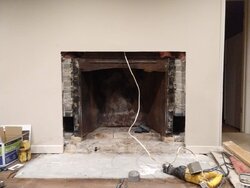
2103456919793653084.jpg

3) Does anyone have a recommendation for an insert can fit in this space? Most inserts ive looked at are too tall in the back as this slants aggressively. (Attached)
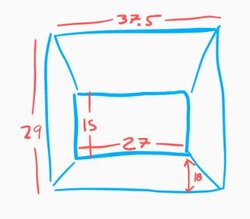
Insert Clearance.JPG
 
You need to figure out what is there and check with the manufacturer to see if an insert can be put in it first.

If the answer is no, or you can't find out what it is, you will need to rip it out completely.

You could end up better off ripping it out anyway, as this may leave you a lot more options in choosing a new prefab.
 
You're going to have to expose a lot more of the wall than what you have there. You need someone knowledgeable in the business to inspect the firebox to see if it's even any good before you go further. I'd guess that it's probably rotted out and that's why it was covered up. "Believing" it is something and knowing what it is are very different and could cause a lot of problems later. After you establish what you have then it has to be faced and the hearth extension done to code and then, maybe, you can think about putting an insert in it. Congratulations, you've open Pandora's box.
 
  • Like
Reactions: spudman99
If it were me, I would tear out that whole wall. It would give you a better idea of what you have to work with, and it doesn't look like it has very good support anyway.
 
Heres what I wound up doing:
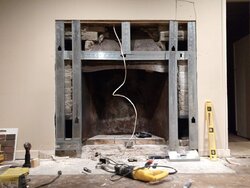
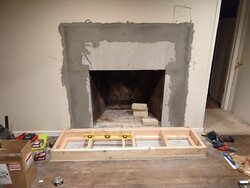
Cutting back more drywall and used metal studs to frame supports for cement board. These are tied into the existing wooden studs.
IMG_20190210_210356971.jpg

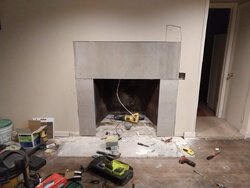
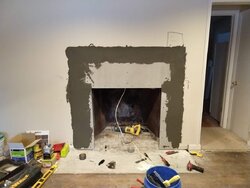
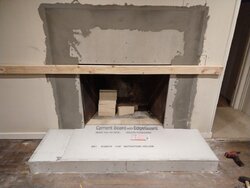
Install cement board and apply thinset to level out any transitions
IMG_20190211_211850145.jpg IMG_20190214_174245907.jpg

Replacing firebrick and refractory mortar + pouring concrete for a void that I didn't want to frame
IMG_20190220_203514612.jpg

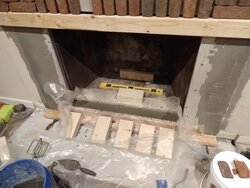
Hearth riser framing + cement board x 2 to hit required R value to combustible studs below
IMG_20190218_203102971.jpg IMG_20190221_210847914.jpg

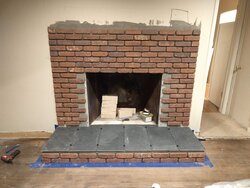
Applying thin brick and slate tiles
IMG_20190223_201751485.jpg

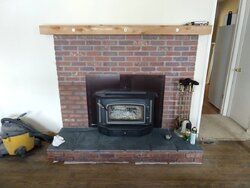
I picked up a Regency i2400 on CL for $450 bucks and threw about a hundred in replacement firebrick inside.
The surround is made from some decorative mesh and has since been riveted into 1 solid piece.
IMG_20190331_181850993.jpg

I still need to add the mortar to the thinbrick on the hearth riser, but so far I am pleased.
There is no problem getting the house into the mid 60s on those really cold sub-0 nights.
All in all I don't expect any utility savings from burning after I consider my time spent gathering and splitting wood but its quite enjoyable.


Estimated cost breakdown:
Insert: $600
Liner: $340
Supplies: $650
_____________
Total: ~$1590
 
Last edited:
Ok that is not a code compliant fireplace at all which is required to install that insert. That face needs to be solid masonry not open air and sheet metal and the hearth extension can't be framed with wood.
 
Estimated cost breakdown:
Insert: $600
Liner: $340
Supplies: $650
Stove: $550
Chainsaws: $1000
Old pickup truck: $2500
Trailer: $500
Mauls, axes, hatchets, sledge, wedges: $100
Wife Read A Magazine Article About Chainsaw Safety So Now I Have This..... Outfit: $200
Winch and cable: $250
How Does This Truck Need A Differential Already: $1250
Chainsaw sharpening systems, several kinds: $250
Okay This Maple Is Six Feet Across And Solid Knots, Time For A Log Splitter: $1000
Brush: $20
Poles: $50
This Saw Could Do With A Longer Bar And Extra Chains: $100
Soot eater: $100
Inspection camera: $40
Special rack that holds not even one load of wood but the wife liked it: $50
IR themometer: $20
How Did I Go So Long Without A Peavey: $60
This Truck Is Too Big For These Trails, But A UTV Would Be Perfect: $3000
Lube for loud blower fan: $10
Rebuild armature for loud blower fan: $100
New bushings and bearings for loud blower fan: $50
New blower fan: $200
Stovetop fan to use instead of loud blower fan: $50
Oh, I Can Just Bolt A Bigger Top End Onto This Saw? Okay Then: $200
Tired Of Dragging The Shopvac Over To The Stove: $50

....no total, list does not end.

Laugh if you want, this is mild compared to Ashful's damages. ;)
 
Cosmetically it looks great, safety wise.. very bad decision.
You took non inspected ul 127 listed product, blocked all the vent holes that make it ul 127, installed a non compliant wood burning insert made for approved masonry fireplaces (approved masonry has a minimum of 8" thick masonry) your hearth pad of cement board over wooden 2x6's is basically ember protection, perhaps it has a little more protection but I'm fairly certain that it isn't enough to prevent pyrolysis overtime, same with the metal box that once was a heatilater fireplace, since the venting was altered it no longer functions as designed and could allow for heat to build up breaking down the wood (lowering the flash point) and will eventually catch the house on fire.
I only talk this strong because there is serious safety at risk, i'd rip everything out and start over properly, I'm also afraid at this point to see the chimney, essentially for all I know it could be metal duct work with a non insulated liner in it.
Its ok to tell me to go pound salt, you posted it, I'm just giving you my 2 cents here, cosmetically very nice, safety wise, very bad.
 
Stove: $550
Chainsaws: $1000
Old pickup truck: $2500
Trailer: $500
Mauls, axes, hatchets, sledge, wedges: $100
Wife Read A Magazine Article About Chainsaw Safety So Now I Have This..... Outfit: $200
Winch and cable: $250
How Does This Truck Need A Differential Already: $1250
Chainsaw sharpening systems, several kinds: $250
Okay This Maple Is Six Feet Across And Solid Knots, Time For A Log Splitter: $1000
Brush: $20
Poles: $50
This Saw Could Do With A Longer Bar And Extra Chains: $100
Soot eater: $100
Inspection camera: $40
Special rack that holds not even one load of wood but the wife liked it: $50
IR themometer: $20
How Did I Go So Long Without A Peavey: $60
This Truck Is Too Big For These Trails, But A UTV Would Be Perfect: $3000
Lube for loud blower fan: $10
Rebuild armature for loud blower fan: $100
New bushings and bearings for loud blower fan: $50
New blower fan: $200
Stovetop fan to use instead of loud blower fan: $50
Oh, I Can Just Bolt A Bigger Top End Onto This Saw? Okay Then: $200
Tired Of Dragging The Shopvac Over To The Stove: $50

....no total, list does not end.

Laugh if you want, this is mild compared to Ashful's damages. ;)

Getting to enjoy the ambiance and warmth of an open flame from the comfort of your living room with loved ones.... Priceless.


Unless you're the OP and burn your whole house down.
 
Last edited by a moderator: