Another PE FP30 install

  • Active since 1995, Hearth.com is THE place on the internet for free information and advice about wood stoves, pellet stoves and other energy saving equipment.

    We strive to provide opinions, articles, discussions and history related to Hearth Products and in a more general sense, energy issues.

    We promote the EFFICIENT, RESPONSIBLE, CLEAN and SAFE use of all fuels, whether renewable or fossil.

bfast250

Burning Hunk
Dec 6, 2013
111
Missouri
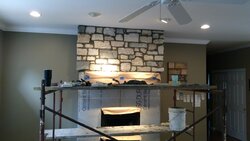
I finally had some time to post pics of my FP30 install. After much research and some help from you fine folks, I decided to do the demo and install myself. I have never done any stone work so I elected to pay someone else to do that since this is the focal point of our house.

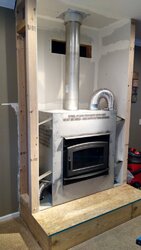
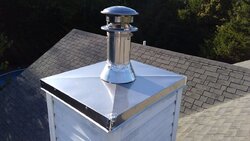
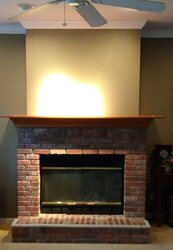
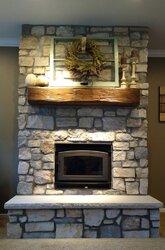
Existing fireplace (heatilator ec42), chimney, and rusting galvanized chase top were completely removed. The minimum 2" to combustibles was NOT met on the existing chimney. The new fireplace is a PE FP30 arch with remote heat duct kit to the basement. 16' of class A (TLC) and a new stainless chase cover. The stone is a natural thin cut veneer (Semco Rockport Blend) and the hearth is the same.

I hope these pics are useful to someone. I had doubts about much of my install and found a lot of answers on this site. I would love to answer any questions anyone has about the materials, process, etc.

I really enjoyed this project. I am glad to move on to other projects and most of all I am ready to feel the heat from this beast! I have had two small break in fires so far. Looks like some cold weather this week. I have been scrounging wood for 3+ years - again, thanks to the advise of those on this great site.

Before and install pics:
IMG_20170417_185709332.jpg

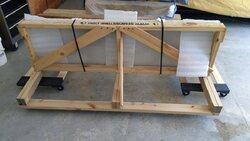
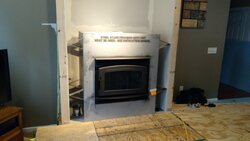
I was really worried about getting the thing in and on the raised hearth. I built a ramp and used furniture dollies. Three of us lifted it while my wife slid the furniture dollies out.
IMG_20170617_090147704.jpg IMG_20170705_183958368_HDR.jpg

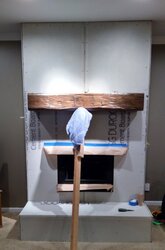
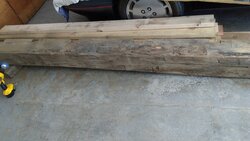
100+ year old hand hewn barn beam. I used a nylon cup brush and 3 different stains to get the look we were after.
IMG_20170721_143542670.jpg

Beam after:
IMG_20170821_200358078_HDR.jpg

Custom cut limestone hearth:
IMG_20170822_145433270.jpg IMG_20170930_171053097.jpg

Stone work in progress!
IMG_20171013_121354214.jpg

After (note the mortar is not yet quite dry in this pic) :
IMG_20171017_113133828.jpg
 
Last edited by a moderator:
Wow, that's quite a stunning change. It looks awesome. Thanks for posting.
 
YES! That's awesome. Your efforts were totally worth it for aesthetics alone. If you get some heat out of it, well, it's all gravy...
 
That looks really nice. Great job!! You’re going to really enjoy the FP30.

Did you install an outside air kit?
 
Last edited by a moderator:
That looks really nice. Great job!! You’re going to really enjoy the FP30.

Did you install an outside air kit?
Yep. I forgot to mention the insulated oak and laminated beams in the basement.
 
Awesome!
 
So last night was my first real burn. I built a small fire to get temps up, and put 2 pieces of oak and 2 pieces of sassafras in at 9pm. Air was all the way down after 5-10 mins and by 10 the condar was reading above 650, but lower than 700 right above the door (with the fans on medium). I woke up and checked it at 11:30 and had same temps with slow lazy flames and almost no secondaries. Woke up again at 4:30 and temps were down to 400 with a few glowing coals left. At 6:30 the coals were out and there was still warmth in the stones above the fireplace.

Does this sound about right? It was only 41 last night...should I be concerned with the way it's burning knowing colder temps will increase my draft? Thanks in advance for the help!
 
Great stuff. First burn is always fun, even in the 2nd year. Those temps and times sound about right. As for the coals being out at 6:30 am, if you raked those coals to the front and opened up the air, those coals should start to glow again ready for another load.
As for the draft, be careful if you have a long stack. My chimney is about 26ft and I was getting crazy high draft which was sending the FP30 into near overfire territory. At the advise of my installer, I blocked off about 2/3 of the OAK vent on the outside and that made the fire more controllable.
Thanks saydinli. I recall your thread and post on taping off some of your oak. I only have a 16 foot stack.

Tonight's forecast is down to 34 so I will keep an eye on it. I am hesitant to load it very full until I am confident I have good control.
 
Last edited by a moderator:
Well last night was a bit interesting. I loaded 3 medium size oak splits and two medium/large cedar splits. Shut the air down all the way within 5 mins. An hour later temps were just above 700 based on the condar right above the door. My laser thermometer only read 560ish? Any idea why such a large difference? Which one is more accurate?

I had the fan and remote heat duct on high the entire time. I took a short video and will post it here once I get it uploaded.

I am thinking I will block off half of the OAK as suggested and see if that helps. Any other thoughts? I surely don't want to over fire and I also am hesitant to load it full until I know it's going to stay in a safe zone.

Split size is something else I know I need to change. Unfortunately that won't happen until next year as everything I split 3+ years ago was medium/small.
 
That sounds about right for 5 splits. If the highest you got was 700 then you are good and in cruising territory. My laser thermometer and my magnetic are off as well. I've read that the cheaper laser thermometers may not be as accurate as the temps get higher but I only use it as a guide by pointing it at various spots in the front to give me an idea of the temps. Once the temps drop below 0 ::Cor 32 ::F you may want to consider closing up half the OAK if things get crazy too fast. My OAK vent is stainless, so I used foil tape to cover about 2/3rd's of it, works really well.

As you can see, the FP30 is quite the easy breather so it will take a bit of time to get used to it. I would recommend not to load it up too much in the beginning until you start to figure out how it likes to burn. One thing I can tell you is the FP30 LOVES big splits.
Wow, thanks for the info. I wasn't expecting 700+ temps with the air all the way down!

My splits nearly doubled in size once I knew for sure I was going with the FP-30. Now they just need to dry..

Here are some videos I took. Interested in your thoughts on the burn rate. Thanks!!http://cloud.tapatalk.com/s/59f0c3d124e65/VID_20171024_214853368.mp4


The burn looks really nice. Can see the secondaries going nicely. Try blocking off half the OAK like you mentioned before the next burn and see if that helps slow down the flames down low.
When you loaded the 5 splits was there a bed of hot coals on the firebox floor? I find that I don't always need to open up the air control with a nice hot bed of coals on the bottom still. I'll just throw more splits on top of the coals and then they'll just light up instantly.
You can also try loading E/W during the shoulder season to slow down the burn. Thats what I've been doing this fall so far.
 
Wow, thanks for the info. I wasn't expecting 700+ temps with the air all the way down!

with most noncat secondary burn systems it will seem counter intuitive but turning the air down increases temps. this isnt like the old air tight systems where turning the air all the way down would smolder it out.
 
Cedar burns hot and quick. Larger thick splits of oak only should burn a slower.
 
I was informed to keep my thermometer off to to the left corner of the unit instead of center above the door. Last night I had a fire going and moved the thermometer back to the center to see what would happen. It climbed right up immediately. I was told with the fan running it shows a hotter reading.
 
That looks absolutely sweet! Great job and nice work there.

Sent from my VS835 using Tapatalk
 
Thanks for the feedback everyone! I have taped off a bit of my OAK. I will also move my thermometer. You are the second person I have read mention that on this fireplace. Finally, I will not add so many cedar splits in a given reload.