The Chimney Sweep Online Fireplace, Woodstove, Gas Stove and Barbecue Shop
The Chimney Sweep Online Fireplace, Woodstove, Gas Stove and Barbecue Shop
STOVE DIMENSIONS: 25-1/2" WIDE X 21-7/8" DEEP X 27 1/2" TALL

CONNECTOR PIPE USED, TOP OR REAR: 6" SINGLE-WALL OR DOUBLE-WALL STOVEPIPE
MINIMUM HEARTH (FLOOR PROTECTION) REQUIREMENTS:
ANY SOLID, NON-COMBUSTIBLE MATERIAL AT LEAST 1/4" THICK
MINIMUM HEARTH EXTENSION FROM REAR OF STOVE............ 0"
MINIMUM HEARTH EXTENSION FROM SIDES OF STOVE........... 3"
MINIMUM HEARTH EXTENSION FROM LOADING DOOR OF STOVE... 16"
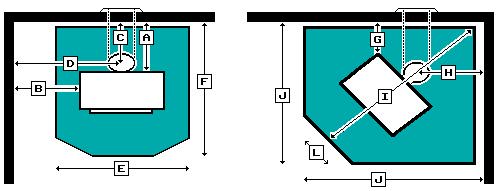
FLAT WALL INSTALLATIONS: | CORNER INSTALLATIONS: |
| A: STOVE TO BACKWALL: NO SHIELD, SINGLE-WALL STOVEPIPE................ 15" REAR SHIELD & DOUBLE-WALL PIPE.................... 8" | G: STOVE TO CORNER WALLS: NO SHIELD, SINGLE-WALL STOVEPIPE.......... 8" REAR SHIELD & DOUBLE-WALL PIPE............ 8" |
| B: STOVE TO SIDEWALL: NO SHIELD, SINGLE-WALL STOVEPIPE............... 17" REAR SHIELD & DOUBLE-WALL PIPE.................. 17" | H: CENTERLINE PIPE TO CORNER WALLS: NO SHIELD, SINGLE-WALL STOVEPIPE.... 20-3/8" REAR SHIELD & DOUBLE-WALL PIPE...... 20-3/8" |
| C: CENTERLINE PIPE TO BACKWALL: NO SHIELD, SINGLE-WALL STOVEPIPE................ 20" REAR SHIELD & DOUBLE-WALL PIPE.................. 13" | I: DIAGONAL CORNER TO FRONT
OF HEARTH: NO SHIELD, SINGLE-WALL STOVEPIPE.......... 67" REAR SHIELD & DOUBLE-WALL PIPE............ 67" |
| D: CENTERLINE PIPE TO SIDEWALL: NO SHIELD, SINGLE-WALL STOVEPIPE......... 29-1/4" REAR SHIELD & DOUBLE-WALL PIPE........... 29-1/4" | J: WALL TO EDGE OF HEARTH: NO SHIELD, SINGLE-WALL STOVEPIPE.......... 62" REAR SHIELD & DOUBLE-WALL PIPE............ 62" |
| E: MINIMUM HEARTH WIDTH....................... 31-1/2" | L: WIDTH OF HEARTH AT FRONT............ 41-1/2" |
| F: BACKWALL TO FRONT OF HEARTH: NO SHIELD, SINGLE-WALL STOVEPIPE......... 53" REAR SHIELD & DOUBLE-WALL PIPE........... 46" |
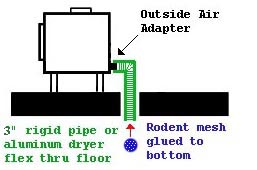
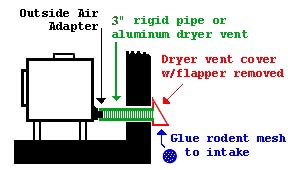
OUTSIDE AIR SUPPLIED FROM CRAWLSPACE | OUTSIDE AIR SUPPLIED THROUGH BACKWALL |